by Chaney Widmer (Mix & Match Design Company)
As an e-designer (or full-service designer!), have you ever found yourself stumped on how to get beautiful, portfolio-worthy images of your finished e-design projects? You’re definitely not alone! It’s something I hear about a lot in the design community and it can be one of the hardest parts of this business, but it’s also one of the most important. Just because we’re providing online design services doesn’t mean that we won’t or can’t have the opportunity to snap photos of our work. If you’ve struggled with this, read on my friend, because I’ve got some strategies for you. (And spoiler alert: it doesn’t involve you asking the client to take the photos themselves because let’s be honest, those aren’t ever going to be good enough to publish!)
I’ve been running my e-design business, Mix & Match Design Company, for the past four years and shooting client projects and my own home for over seven. Over that time, I’ve developed a method for how to navigate this tricky aspect of e-design. Today I’m excited to share a peek into that and talk about what has worked beautifully for me so that I can consistently create content to share on my website and social media, and also use for marketing and publicity purposes.
The first part of this method involves bringing portfolio projects to completion.
Let’s start by tackling this first since in order even think about getting photos, you have to have a completed project that you’re proud of and want to shoot. Set your sights on working with a few local clients each year to give yourself an opportunity to be a little more hands-on with the finishing touches of a project. Remember that just because it’s e-design doesn’t mean you can’t step foot in the room when it’s done!
Make it a goal to work with 10 local clients during the year (at least!). This doesn’t mean you’ll be shooting all 10 of those projects; in fact, you’ll probably shoot five of them at the most because not all of them are going to turn into portfolio-worthy projects. Since so much is up to the client to complete the project with e-design, the truth is that many projects won’t make the cut – either because they never get finished or the client doesn’t end up following your vision and plan. That’s ok. Odds are that at least SOME of them will turn out to be amazing and you’ll have the opportunity to get your hands on photos of them.
If it does meet all of your expectations and turn out beautifully, ask the client if you can come style it and shoot it – I find they’re usually honored to be asked!
Then it’s time to get those photos!
Once you’ve got that perfect project ready to shoot, the next step is to figure out how you’re going to get those photos. And you want them to be GOOD. If you’re going to devote time and energy to make a space ready for photos, make it worth your while. Be sure to get as many photos as you can too – that way, you’ll have plenty of content to share and add to your portfolio.
Your can either:
- Hire a pro photographer
- Shoot the space yourself
Hiring a pro can be expensive (as high as $1,500+ per shoot!), but by going that route, you know you’ll end up with awesome photos. The alternative? Shoot the space yourself. This may seem like a daunting idea at first, but just like any other skill, it’s something you can learn if you devote time and energy to it!
Being your own photographer allows you to shoot not only client projects, but gives you the chance to consistently and continuously create new content using your own home and other spaces as well.
If you do want to learn, here’s a peek into my approach (along with some tips!) for capturing those pretty images of interiors.
- Turn off all the lights! Natural light is your best friend for interior photography. Even if this makes a room dark to your naked eye, you’ll be able to compensate for that with the right equipment, which leads me to step two…
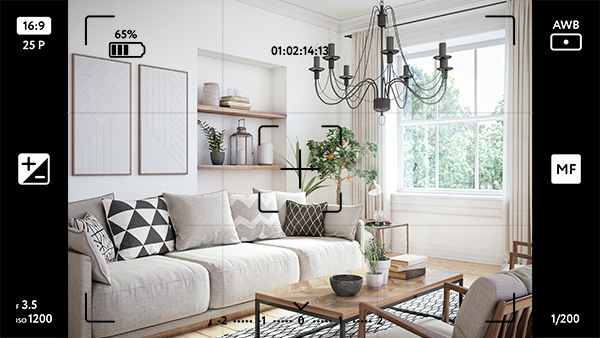
- Get the right equipment and know how to use it. The three main items I always have on hand are a DSLR camera, a tripod, and a remote shutter. Set that DSLR to manual mode so you have full control over aperture, shutter speed, and ISO. This allows you to be able to tell the camera exactly what to do to get that crisp, bright photo no matter the lighting conditions thanks to the tripod and remote shutter.
- Find the best angles of the room, and make sure to take a variety of photos like wide shots and vignettes. Good composition is key! Study what other pro photographers do well in magazines and places like Instagram that catch your eye. Make it a goal to try to mimic that look.
- Keep your vertical and horizontal sight lines straight. Snapping photos from too high or too low of an angle skews them in a way that looks unnatural and gives your photo a less editorial look.
- Enhance your images in an editing software like Photoshop or Lightroom to add the finishing touches and really make them shine!
So, are you ready to give interior photography a try? You CAN get gorgeous photos of your work as an e-designer – I’ve done it! Learning to shoot your own photos definitely takes time, effort, patience, and persistence, but it’s worth it.
Are you ready to learn how to snap those beautiful, portfolio-worthy photos of interiors? Join me for a FREE 5-day jump-start!
You’ll figure out where you want take your photography skills, determine where you currently are, and make an actionable plan for how to move forward! Head on over here to sign up.
If you want to take your design business to the next level, you can also click here to find out more about Mix & Match Design Company’s online courses for e-design and interior photography.