Moodboards are the secret sauce to winning over your clients and bringing your interior design ideas to life! With the right layout, you can help clients visualize their dream space, get them excited about the design direction, and make your presentations pop.
From inspiration image boards to detailed sample collages, moodboards help you sell your vision to your clients while reinforcing your unique brand style. Whether you want to showcase textures, finishes, or full-room concepts, moodboards are usually the first visual impression your client has of your design. Each layout can serve a unique purpose. In this guide, we’ll cover 7 go-to moodboard layouts to elevate your client presentations and make your designs shine.
Table of Contents
What is an interior design moodboard?
An interior design moodboard is a visual tool that helps designers communicate their ideas, concepts, and design direction to clients. It’s a curated collection of images, textures, colors, materials, and product selections arranged to capture the overall vision for the space and how the various elements work together. Moodboards help bridge the gap between a designer’s vision and a client’s expectations by presenting a clear and cohesive style before committing to a final design.
Whether you’re creating a physical board or using digital tools, moodboards allow for experimentation and creativity, making it easier to refine ideas and gain client approval early in the design process.
Moodboards are essential for streamlining client collaboration. Clients get to see their ideas and your vision organized. Providing this visual reduces misunderstandings and ensures you and your client are on the same page.
With the right moodboard software, it’s easy to put together stunning designs for your clients.
7 moodboard layouts to try
Checkout these 7 unique moodboard layouts—complete with examples!
1. Combination board
A combination board is a great way to showcase your interior design ideas by mixing floor plans, 3D renders, and individual product picks. This layout helps clients get a clear sense of both the big picture and the specific details. By combining visuals like perspective views and close-up product shots, you make it easy for clients to see how everything will come together in the final space. It’s perfect for showing functionality, spatial flow, and aesthetics all in one cohesive presentation.
Example:

In this example, the combination board features a 3D render alongside key product selections. The layout highlights the vanity, mirror, and wall sconces, helping the client visualize how these elements come together in the finished space. The 3D render shows how the vanity is placed within the overall bathroom design, including the marble wall tiles, patterned floor tiles, and modern fixtures. This approach makes it easy for the client to connect the individual products to the completed space, providing clarity and confidence in the design. The included color palette reinforces the overall approach.
2. Inspiration image board
An inspiration image board centers around a stunning image of a completed space to establish the design’s mood and direction. This layout is perfect for giving clients a clear idea of the overall aesthetic while supporting it with materials, finishes, and fixtures that capture the same vibe and style.
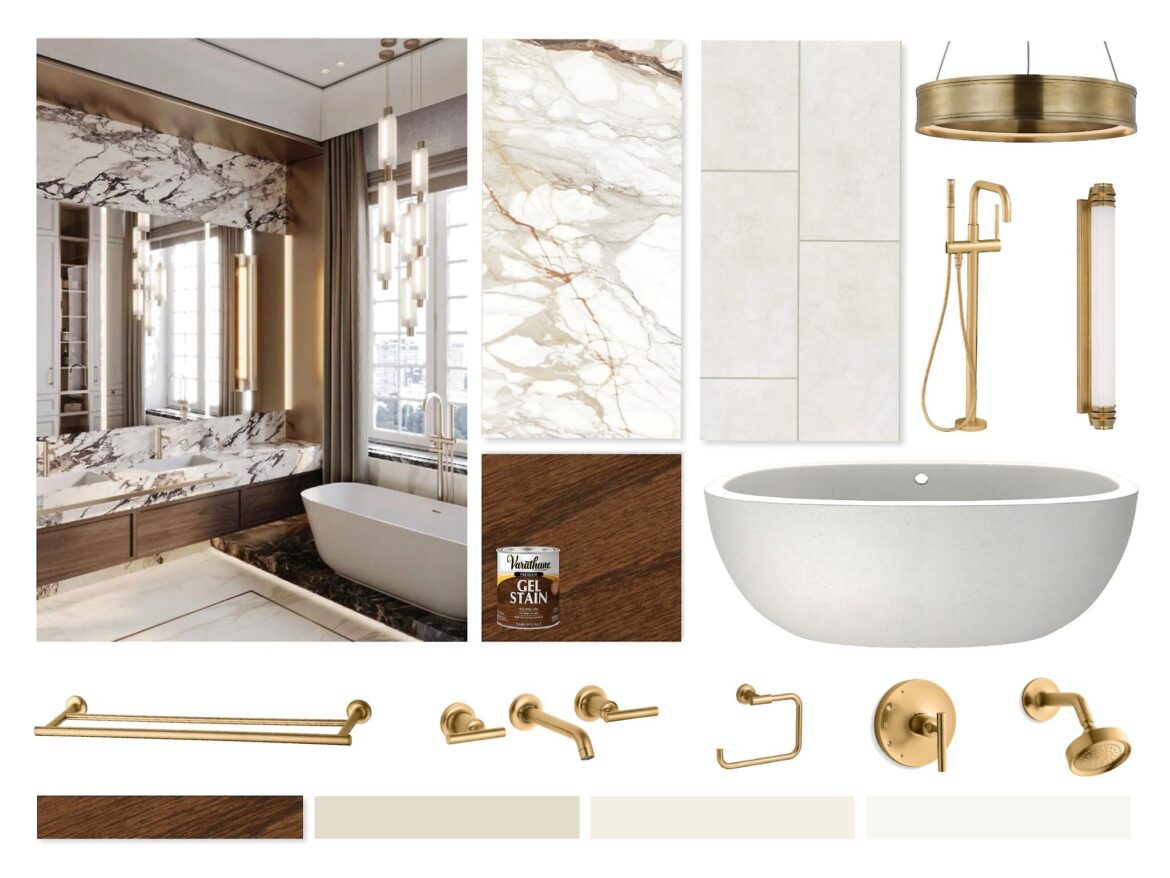
In this board, the luxurious bathroom image sets the tone with marble surfaces, gold fixtures, and sleek design elements. Surrounding it are complementary details: marble tiles, brass hardware, a freestanding tub, and a wood finish. This cohesive presentation helps the client visualize how each material contributes to achieving the same elegant, high-end look.
As the designer, you have the option to show or hide pricing. You can reveal pricing to show clients what their dream space would cost realistically. Or, you could hide the pricing to focus on providing an up-close look at the elements.
3. Structured sample board
A structured sample board is a well-organized way to display the materials, finishes, and textures for a design project. This type of board can be shown digitally or in person. Your presentation should focus on the final finish selections and where they will be located.
Each sample is labeled to indicate where it will be used in the space, making it easy for clients to understand how different elements come together. This layout works perfectly for showcasing the finer details and ensuring that every material aligns with the overall design vision.
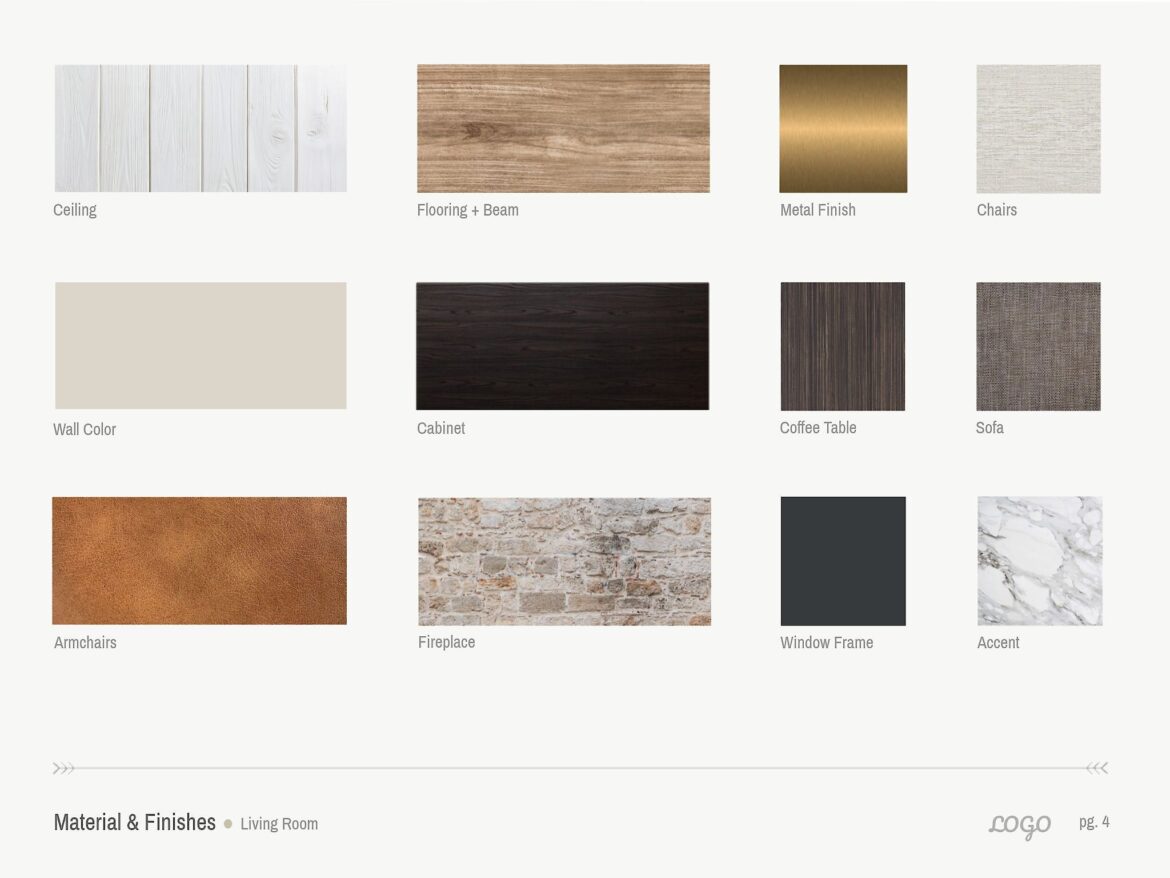
This structured sample board presents a variety of finishes for a living room design, including wall color, cabinet finish, and metal accents. Each element is clearly labeled, from the ceiling and flooring to the fireplace and window frame. The layout helps the client see how different materials—like warm wood tones, marble accents, and textured fabrics—blend cohesively, offering a detailed preview of the final design.
4. Collage sample board
A collage sample board is a visually engaging way to present finishes and materials, giving clients an immediate feel for the overall design by layering samples to present the design concept. The layout allows you to scale different elements based on their importance in the space, highlighting which finishes will have the most impact and how they interact harmoniously.

This collage sample board blends key design elements like wood flooring, marble countertops, brass fixtures, and textured fabrics. The bold green backsplash tile and marble surfaces stand out due to their larger size, emphasizing their prominence in the design. Smaller accents like the brass hardware and greenery add finishing touches, completing the aesthetic vision.
5. Open design concept board
An open design concept board features product images with their backgrounds removed, creating a clean and distraction-free presentation. This method allows clients to focus solely on the furniture or samples individually while still allowing them to see how they work as a whole. You can communicate the overall design concept without confusing background details.
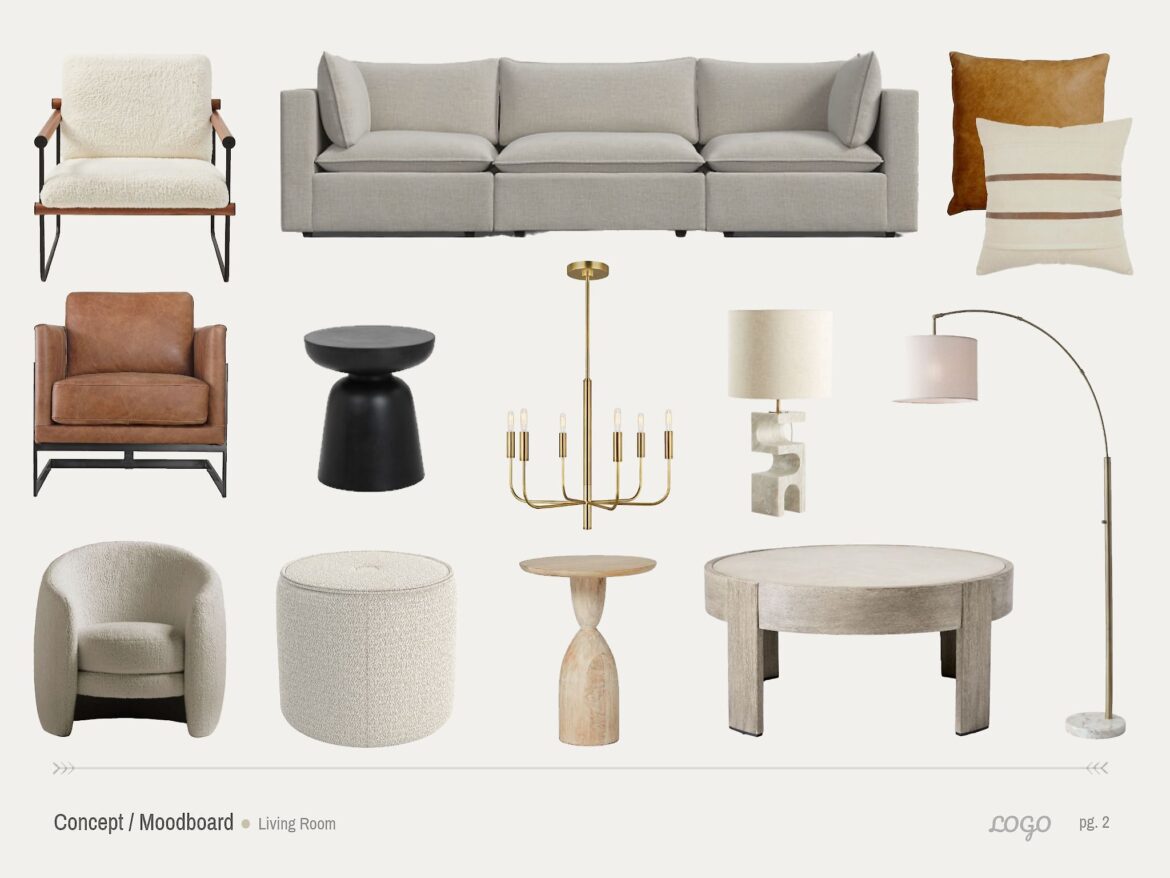
This open design concept board showcases living room furnishings like a neutral sofa, leather chair, black side table, and brass chandelier. Each piece is isolated, highlighting its role within the design. The clean layout helps clients clearly envision how these elements—textures, tones, and materials—come together to form a cohesive space.
6. Open design concept board with swatches
An open design concept board with swatches combines product images and color or material samples, creating a complete visual story. The cut-out products keep the layout clean and focused, while swatches highlight the key colors and finishes. This approach helps clients see how each element ties together within the overall design.
This style of board is great for:
- Highlighting custom products that will be reupholstered
- Showcasing finish selections for furniture frames and bases
- Providing extra security for you when they approve designs because you can get everyone on the same page
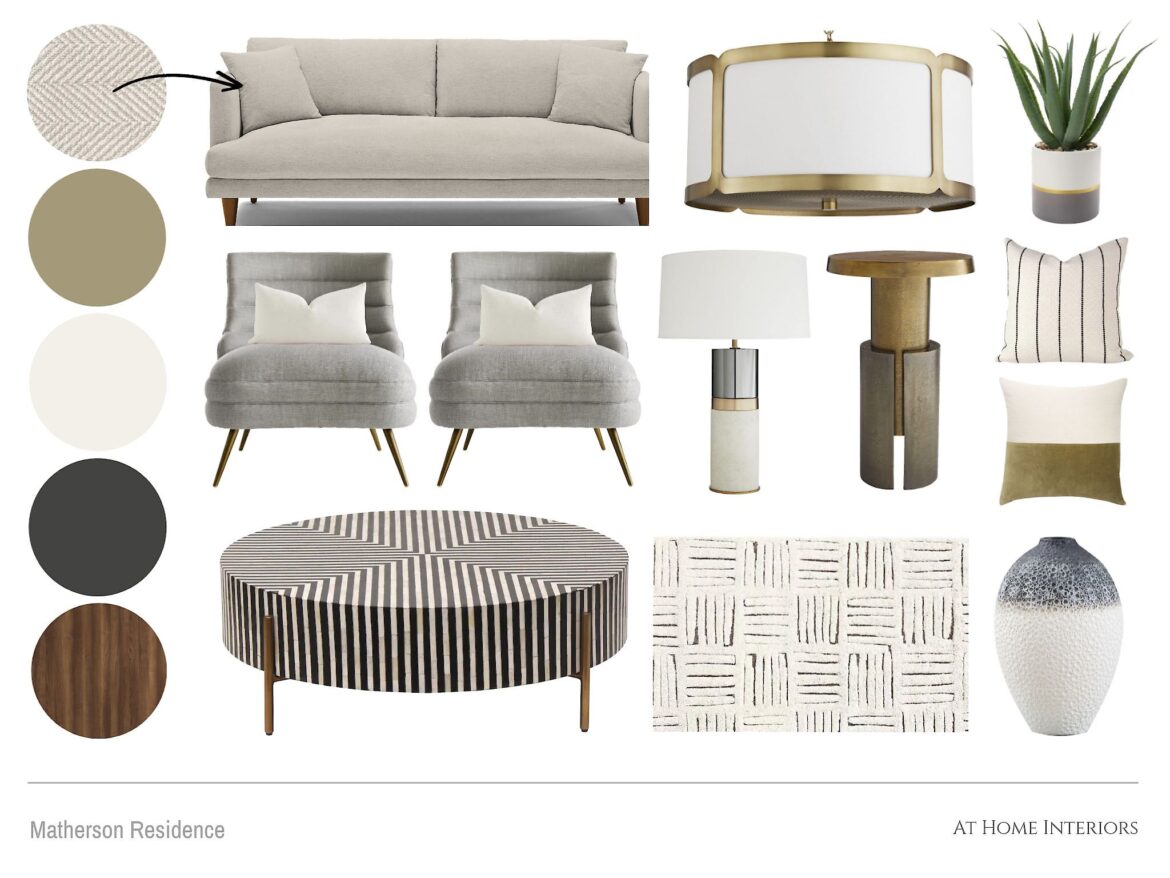
This example for the Matherson Residence features a neutral sofa, stylish chairs, and brass lighting, alongside swatches of green, cream, and wood tones. The swatches emphasize the color palette and materials, reinforcing the design theme. The clean presentation shows how furniture and decor pieces complement each other, creating a cohesive and balanced look.
7. Framed concept board
A framed concept board organizes design elements into distinct sections, using frames or borders to separate and categorize items. This structure creates a clean, cohesive presentation, helping clients clearly understand how individual pieces and color palettes come together. Each section can feature furniture, decor, textures, or colors, making it easy to visualize the design’s flow while keeping everything organized and visually balanced.
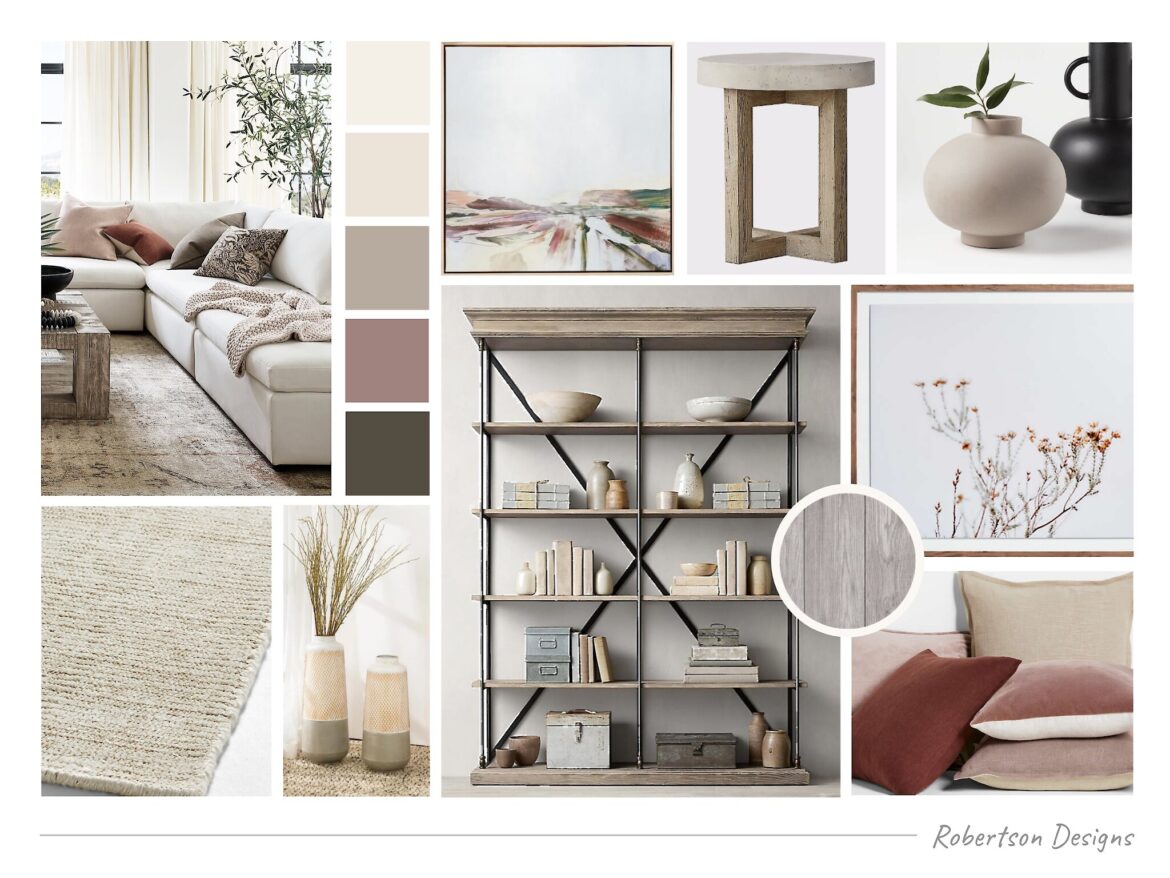
In this example for Robertson Designs, each element—like the neutral sectional, shelving unit, and accessories—is framed within its own section. The color palette is displayed alongside curated materials, decor items, and textiles. The frames highlight specific aspects of the design, while the overall layout emphasizes a calm, cohesive, and modern aesthetic, making the concept easy for clients to visualize.
Frequently asked questions about moodboard layouts
Consider your project goals and what you want to highlight. For detailed finishes, try a structured or collage sample board. If you need to show the big picture, use a combination board or inspiration image board. For clean, distraction-free visuals, an open design concept board works best.
Moodboards provide a clear, visual representation of your design ideas, helping clients see the style, color palette, and materials. They reduce misunderstandings, generate excitement, and ensure everyone is aligned with the vision before moving forward with the final design.
Start by gathering inspiration images, product photos, and material swatches that align with your design vision. Use digital tools like DesignFiles to arrange these elements on a moodboard. For a deeper dive, access our free training video to master perspective, layering, background removal, and other pro techniques that elevate your designs.
DesignFiles is the ideal platform for small and solo design firms. Try our moodboard editor.
![2026-2027 Interior Design Conferences & Tradeshows [Ultimate List]](https://blog.designfiles.co/wp-content/uploads/2024/11/interior-design-events-768x512.jpeg)