

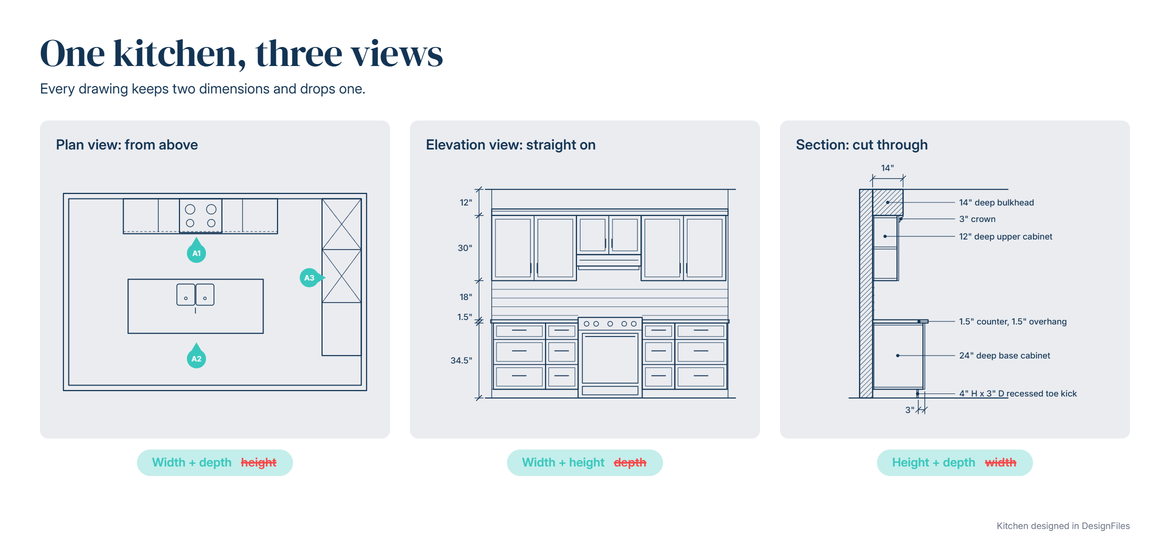
An elevation view shows one wall straight on, so every height is measurable. A plan view looks down on the room from above. A section slices through a wall or cabinet to show what’s inside.
Here’s the moment this matters. Your contractor emails on a Tuesday night. He wants kitchen elevations, plus a section through the pantry wall.
You have a gorgeous floor plan. That’s it. And now you’re wondering if you’ve been missing half a drawing set.
Let’s be honest, nobody explains this part well. The three views get lumped together as “the drawings.”
In my workshops, the drawing question I hear most is which one contractors want. The honest answer is usually more than one.
So let’s sort it out. You’ll get each view on its own first. Then you’ll see all three on one real kitchen, designed in DesignFiles.
| Plan view | Elevation view | Section | |
|---|---|---|---|
| Where you’re standing | Above the room, looking down | In front of one wall, looking straight at it | Beside a cut through the room or cabinet |
| Question it answers | Where does it go? | How high does it sit? | How deep is it, and what’s inside? |
| Dimensions it carries | Width and depth | Width and height | Height and depth |
| What it can’t show | Any height | Any depth (only as a written note) | Anything away from the cut line |
| You’ll use it for | Layout, furniture, clearances | Cabinets, fixtures, tile, trim heights | Bulkheads, soffits, toe kicks, built-in depths |
| On your drawing set | The sheet everything keys back to | Keyed to the plan by an elevation marker | Keyed to the plan by a section cut line |
Table of Contents
Plan view: your room seen from the ceiling
You already know this one. It’s probably where your design started.
A plan view shows the room from directly above, as if the ceiling lifted off. Technically, it’s a horizontal cut at about waist height. That’s why walls, doors and windows read as clean lines.
The plan carries two dimensions: width and depth. So it’s your drawing for layout, furniture, clearances and circulation. Build rooms in the 3D Floor Planner? Your plan view is that same design, seen from above.
Here’s what it can’t do. A plan has no height at all. It can place a sconce along a wall. It can’t tell anyone how high that sconce hangs.
You’ll also hear “floor plan elevation.” That usually means the elevations keyed off a floor plan. Those are two separate drawings that travel together as a set.
What an elevation view shows that your plan can’t
Heights. Every single one.
So what is an elevation view? It’s one wall, drawn flat and straight on, with no perspective. Width and height are both true to scale. That means you can measure any vertical dimension right off the page.
That covers your cabinet runs, counters, backsplash, sconces, mirrors, tile stops and trim. Our elevation drawing guide has the full walkthrough.
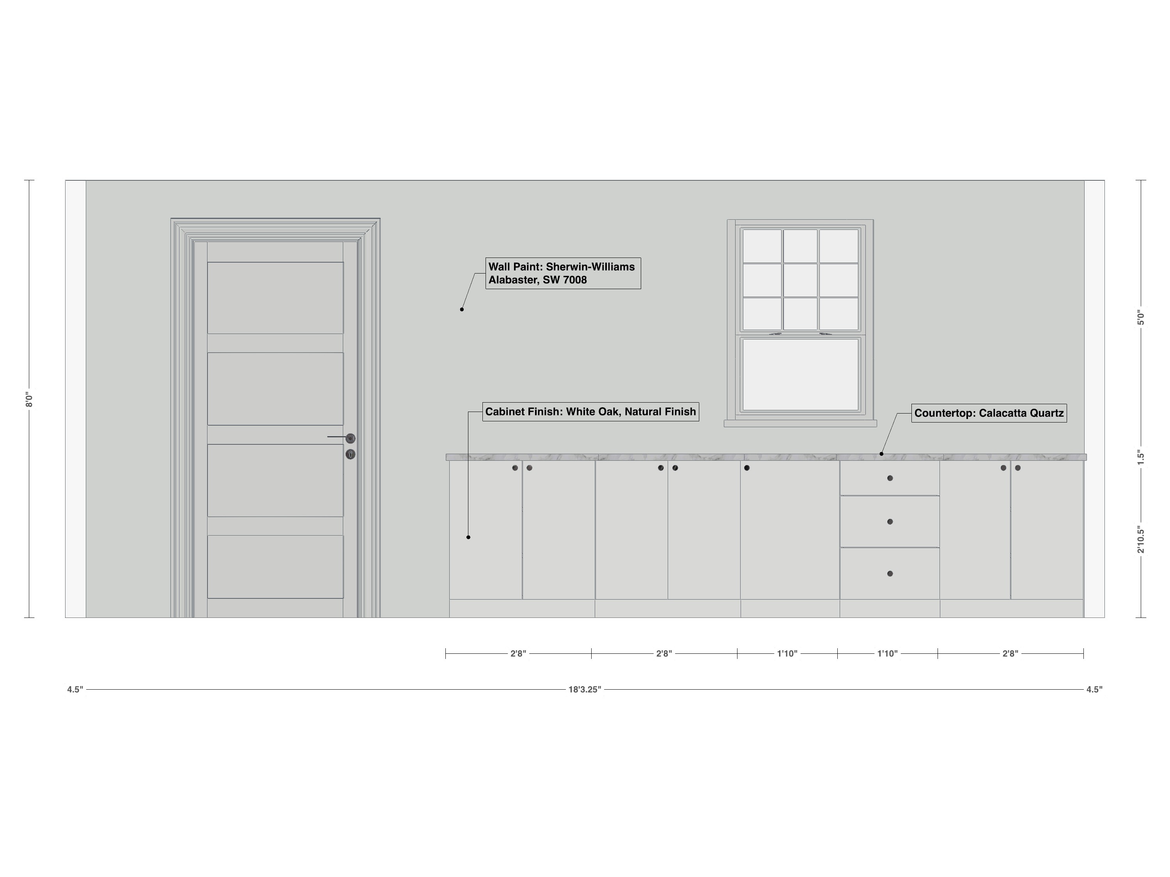
Three tags name the paint, cabinet finish and counter. Up the right side, the heights stack to a 36-inch counter.
What’s missing? Depth. Nothing shows how far the cabinets project from the wall. When depth matters, it gets written as a note.
Where an elevation view lives on your plan
See the labeled arrow on your floor plan? That’s an elevation marker.
It points at the wall being drawn. Its label, like A1 or A2, matches the elevation sheet. That’s how one plan keys a whole set together.
So if a sheet says A2, find A2 on the plan first. Now you know which way you’re facing. Our list of elevation and section symbols covers the other markings you’ll meet.
Interior and exterior elevation views
Exterior elevations show a building’s outside faces. Those are mostly your architect’s drawings.
Interior elevation views show one wall inside one room. Those are yours.
Some guides call elevations an architect’s tool. On a kitchen or bath, that rarely holds up. There, your interior elevation often carries every design decision. Our guide to interior elevation drawings shows what to label on each wall.
Why a section slices the room open
Ever had a bulkhead come out the wrong depth? A section is the drawing that prevents it.
A section is a vertical cut through a room, wall or cabinet. Picture slicing it open and facing the cut. It carries height and depth, the pair your elevation can’t hold.
On the plan, it’s a bold dashed line with arrows, labeled something like Section A-A. A section elevation drawing adds the wall surfaces beyond the cut.
I’ve noticed designers skip sections because they sound like the architect’s job. Then someone on site guesses the bulkhead depth.
Section vs elevation drawing, in one test
Ask yourself one question. Are you looking at a surface, or through it?
An elevation looks at the surface and leaves it whole. A section cuts through and shows what the cut exposes.
Take a bulkhead above your uppers. Straight on, it’s a 12-inch band of drywall. Cut through it, and it’s a box you can dimension.
That settles the interior elevation vs section question. Need to see depth? You need the cut.
When an interior designer needs a section
Plenty of your projects won’t need one. Watch for these triggers:
- A bulkhead or soffit you’re designing
- A built-in with a nonstandard depth
- A recessed toe kick or a floating vanity
- A stepped or coffered ceiling
- A banquette or window seat
Here’s the test. Does depth change how it looks? Does your elevation only mention it in a note? Draw a section.
In one of my workshops, a designer shared a kitchen with a painted bulkhead. Her elevation showed its height and noted its depth in words. The framer built it flush with the cabinet boxes. The crown she’d designed to sit proud of the doors had nothing to land on. Now she sends a quick section through any wall with a bulkhead.
One kitchen, drawn three ways
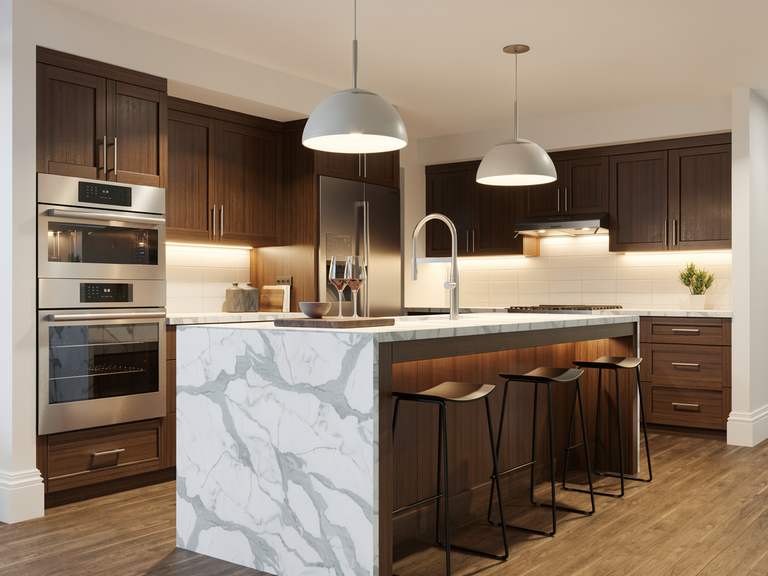
Enough theory. Sheilah MacSporran, our CEO, designed this kitchen in DesignFiles. Here’s the finished room, then the same kitchen drawn three ways.
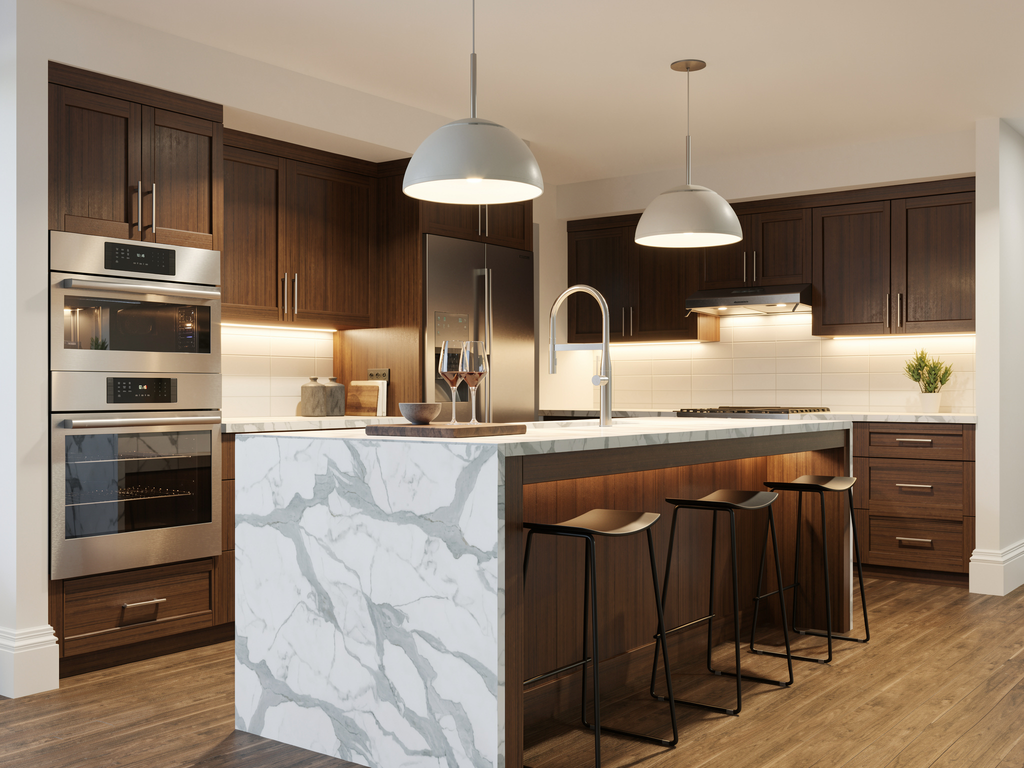
Watch which dimensions each view keeps, and which one it drops.
The plan view of the kitchen
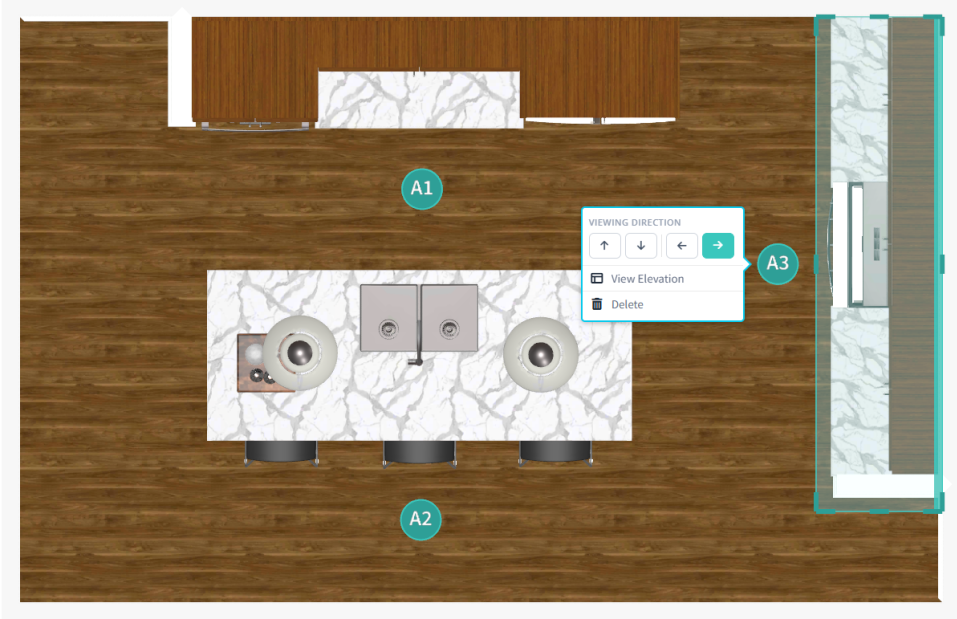
Three markers key the elevations. A1 faces the range wall and A2 faces the island. A3 faces the oven, pantry and refrigerator wall. Our How to Create Elevations tutorial shows how to set each one.
It’s the same 3D design seen from above, so you get real textures. You can see where the island sits and the room around it. Notice the run on the right? It’s visibly deeper than the range wall uppers. That’s depth, and the plan carries it.
What can’t it tell you? The counter height, the pendant drop or the bulkhead.
Elevation A3: the oven, pantry and refrigerator wall
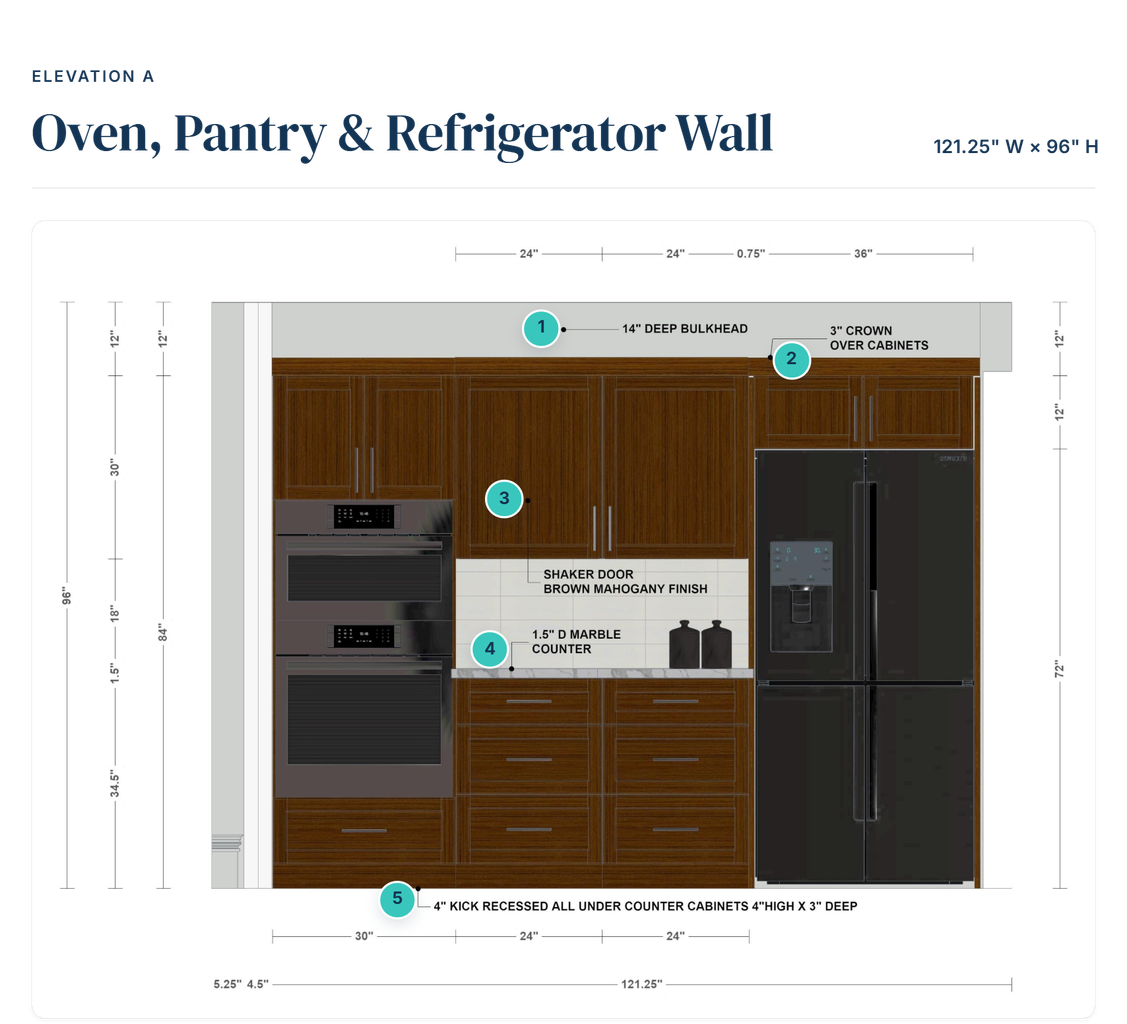
Now stand in front of A3 and read up from the floor. Base cabinets and a marble top reach 36 inches, matching standard kitchen dimensions. Then come an 18-inch backsplash, 30-inch uppers and a 12-inch bulkhead. You can measure all of it.
Now find callouts 1 and 5. The bulkhead’s 14-inch depth and the toe kick’s 3-inch recess are written in words. The elevation can’t draw either.
Here’s the sneakier one. The uppers over the counter are 12 inches deep. Over the fridge and ovens, they’re 24. On this elevation, their faces look identical.
A section through the range wall
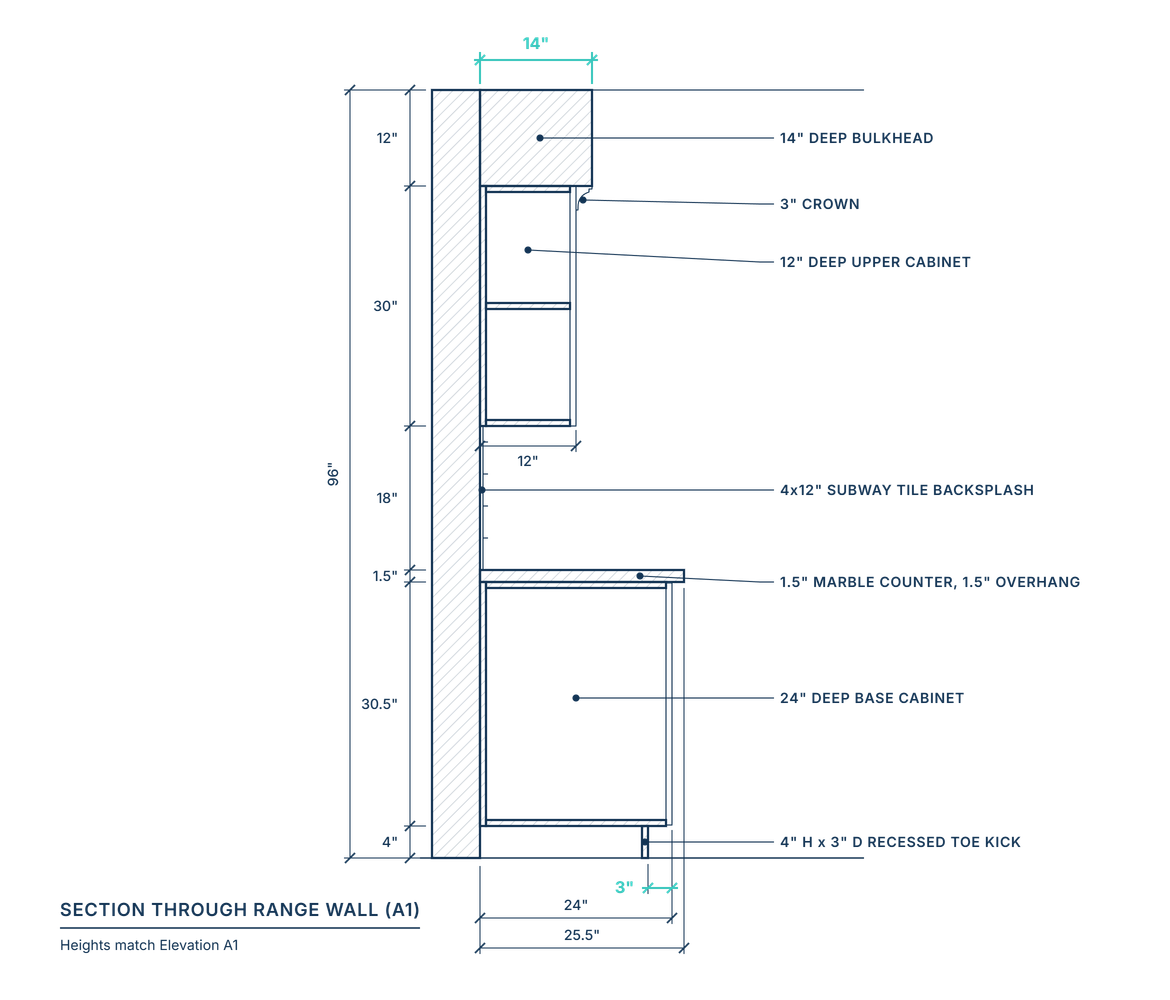
This cut runs through the range wall (A1), just beside the range. Same heights, now with depth.
The bulkhead reads as 14 inches deep, 2 inches past the 12-inch uppers. Below, the counter overhangs a 24-inch base cabinet by 1.5 inches. The toe kick finally shows its 3-inch recess.
Check the heights against the elevation. They match, which is how you know two drawings agree.
The plan placed it. The elevation raised it. The section gave it depth.
Which drawings does your contractor actually need?
It depends on the job. So decide by project type, one set at a time. For the bigger picture on working with trades, see how interior designers work with contractors.
I ask designers in workshops what they send. Answers run from one PDF to twenty sheets. What trips an install is a drawing set that doesn’t match the job.
For a furnishing or paint refresh
A plan is usually enough. Add an elevation only where height matters. Think gallery walls, big mirrors, sconces or a TV. Skip sections entirely. A clean plan plus one or two elevations says you’ve thought it through.
For a kitchen or bath renovation
Send the plan and an elevation for every wall that changes. That’s cabinetry, plumbing, lighting or finishes. Then add a section wherever depth is part of the design. Think bulkheads, floating vanities, recessed toe kicks and niches.
Keep the plan, elevations and spec sheets in one project. Your GC gets one link instead of an email chain. That’s where interior design project management software earns its keep.
For built-ins and custom millwork
This is your heaviest set. Send the plan, an elevation of every face and at least one section.
Your cabinetmaker prices from depth as much as from height. Expect shop drawings back for approval. Check the section first, because depth errors show up there before anywhere else.
Already built the room in the 3D Floor Planner? You’re most of the way there. You can create elevations from the 3D design you already built. No second drafting pass. Designers have already created 4M designs in DesignFiles.
Elevation view FAQs
It’s a flat, straight-on view of one vertical surface, usually a wall. There’s no perspective, so width and height are both to scale. You can measure any height directly, from counters to sconces to trim. Interior designers use elevations to show what happens up the wall. Each one is keyed back to the plan by an elevation marker.
They’re two drawings that work as a pair. The floor plan shows the room from above. The elevation view shows one wall straight on. People say “floor plan elevation” to mean elevations keyed off a plan. On a drawing set, the plan’s markers tell you which elevation shows which wall. Read them together, and neither leaves you guessing.
It’s a section that also shows the wall surfaces beyond the cut. You get the cut profile, with its depths, plus the finished faces behind it. You’ll also hear it called a sectional elevation. It’s handy on interiors. One drawing can show a bulkhead’s depth and the cabinet run behind it.
Start with the plan. It fixes where everything goes, and every elevation keys back to it. Then draw an elevation for each wall that carries design decisions. Add sections last, and only where depth needs explaining. Design in 3D first, and your plan and elevations can share one model.
Ready to see your own room from every side? Open a design you’ve already built and try DesignFiles’s Elevations feature.
![2027 Interior Design Conferences & Tradeshows [Ultimate List]](https://blog.designfiles.co/wp-content/uploads/2024/11/interior-design-events-768x512.jpeg)