

It’s 7:40 on a Tuesday morning. Your phone buzzes.
It’s the electrician. He’s standing in your client’s half-tiled bathroom, and he has one question. How high do the vanity sconces go?
You know the answer. It’s in your head, and probably in a product spec somewhere. It’s just not on anything he can hold. So you stop what you’re doing, dig through your files, and text him a number. Then you do it again for the plumber.
That’s the job of interior elevation drawings. An interior elevation is a flat, scaled view of one wall inside a room. It shows every height on that wall: cabinets, fixtures, tile, and trim. Drawn well, it’s the document that answers the phone for you.
When I ask designers which site call they dread most, it’s rarely a big mistake. It’s the small one: “How high does this go?”
So let’s go room by room. You’ll see what to label on each wall, and exactly where. Then every trade finds its answer on the wall they’re working on.
Table of Contents
What an interior elevation shows that your floor plan can’t
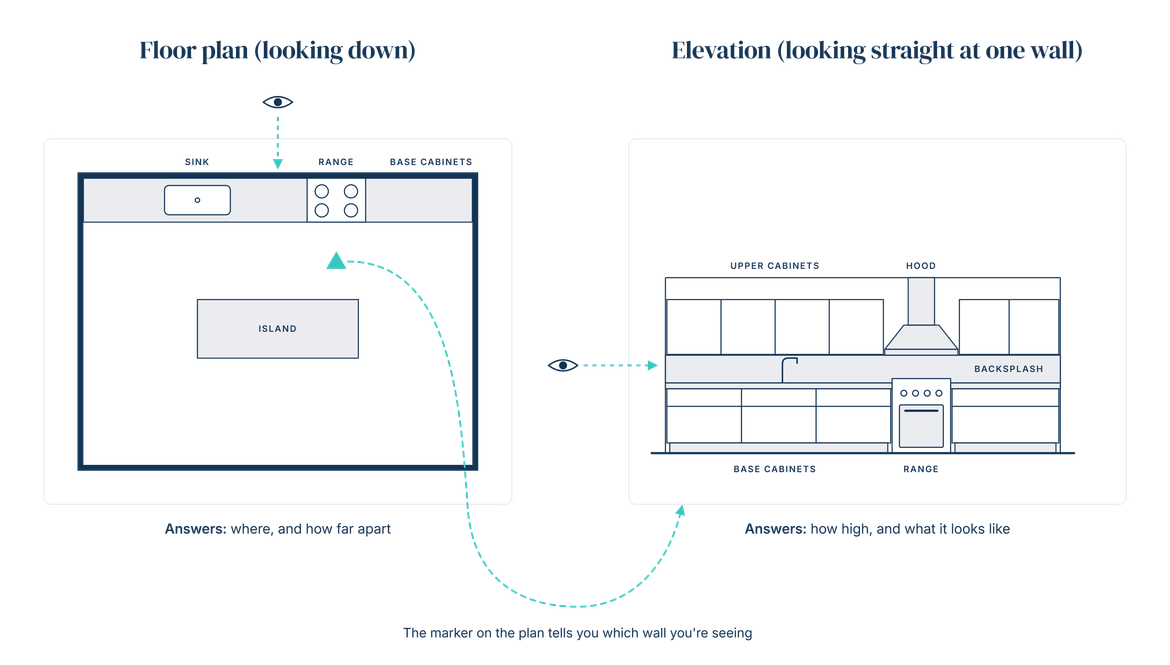
Your floor plan answers one question: where does it go? An interior elevation answers the next two. How high does it sit? And what’s it finished in?
Every wall that carries a design decision gets its own elevation. Cabinets on three kitchen walls means three elevations. A bathroom might need all four. Each gets a marker on your plan, so everyone knows which wall they’re reading. That’s a lot of sheets. It’s also a lot of answered questions.
Want the full definition first? Our elevation drawing guide walks through it.
Fuzzy on how the drawings split the work? Start with plan view, elevation view, and section. This guide skips the theory and stays on your walls.
Here’s the difference on one kitchen. The plan shows where everything sits. The elevation shows one wall, straight on. The marker on the plan tells you which wall you’re looking at.
You’ll also hear about two types of elevation drawings. Exterior elevations show a building’s outside faces. Those belong to your architect. Interior elevations show the walls inside a room. Those are yours, and they’re what this guide covers.
What your interior elevations need to carry
Before a sheet leaves your desk, check it for four things. Each one answers a specific trade’s question.
Dimension strings from the finished floor
Every height on your elevation needs a starting point. Use the finished floor, often written AFF, for “above finished floor.”
Why not just “the floor”? Because floors change. New tile or hardwood can raise the surface by an inch or more. And your plumber, tile setter, and installer might each measure from a different spot.
Stack your vertical dimensions up one side of the wall. They should read like a ruler, floor to ceiling. Anyone on site can find any height in seconds.
Finish and product tags
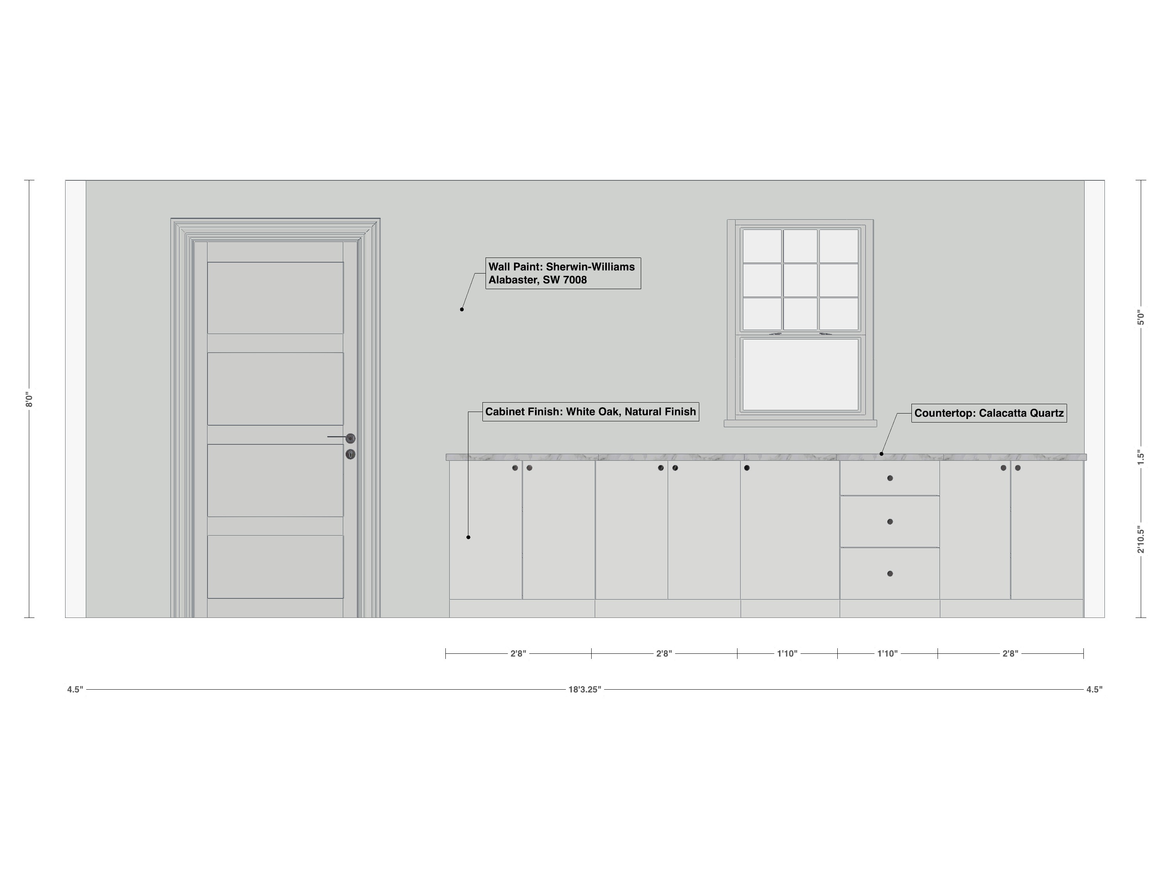
Tags are the short codes on your drawing that name each finish. P1 for a paint. T2 for a tile. CT1 for a countertop.
Each tag points to exactly one line on your spec sheet. One tag, one product, every time. Short, boring, and consistent wins.
Two tiles on one wall? They need two tags, even if they’re the same color in different sizes. Skip that, and the tile setter calls with a two-word question: “Which one?”
On a simple wall, it looks like this. Each tag names one product: the wall paint, the cabinet finish, and the countertop.
Fixture and device heights
This is the list you’re most likely to leave off. It’s also the list behind the electrician’s and plumber’s calls.
Dimension each of these on the wall where it lives:
- Sconce centers and pendant drops
- Mirror tops and bottoms
- Outlets and switches in a backsplash
- Towel bars, robe hooks and grab bars
- Shower valves, heads and handhelds
Dimension to the center of each fixture, unless the product spec says otherwise. Then say which point you used. “Center of box” and “bottom of fixture” can land at very different heights. Your trades can’t hang what you didn’t dimension.
Notes for the things an elevation can’t draw
An elevation shows height and width. Depth? Not at all.
So depth gets written as a note, right on the drawing. How far the hood projects. How deep the niche goes. How far a floating vanity sits off the wall. How far the toe kick is recessed. Each of those is one short line of text.
Sometimes a note isn’t enough. If depth changes how the piece looks, you need a section. Here’s how to tell when you need one.
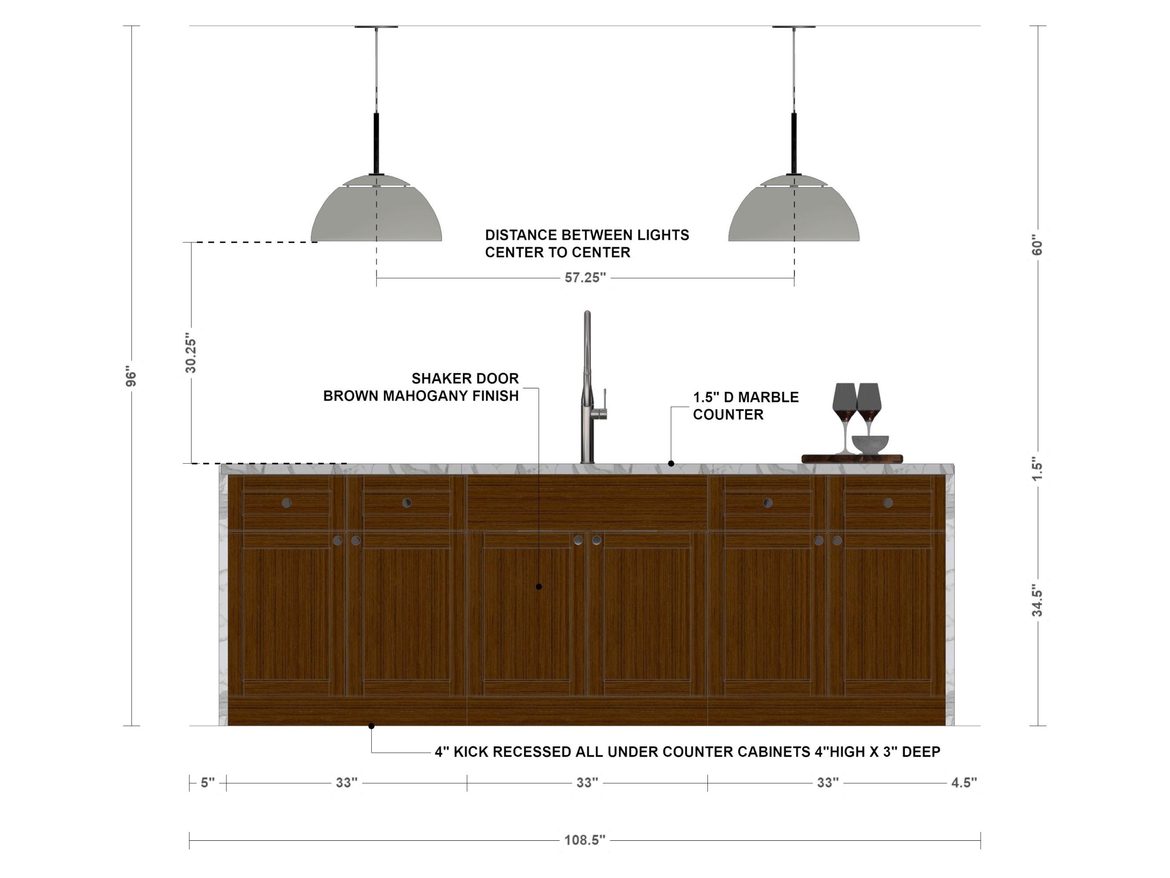
This island elevation carries all four. Heights stack up from the floor. Tags name the cabinet finish and the marble counter. The pendants are dimensioned to the counter and to each other. And a note gives the toe kick’s depth.
How to annotate an interior elevation so nobody calls you
Annotation is where an elevation earns its place in the set. It either answers the site’s questions or creates new ones.
From what I’ve seen, the designers who get the fewest site calls aren’t drawing more. They’re labeling the same way on every wall.
Pick one datum and say it on the sheet
Write it in a note on every sheet: “All dimensions from finished floor.” Put it in the title block or right beside the drawing.
Here’s what happens without it. You set a sconce height with care. The electrician measures from the subfloor, before the tile goes down. Once the floor’s finished, the sconce sits low. Nobody did anything wrong, exactly. The sheet just never said where to start.
Tags or keynotes: choose one system per set
You’ve got two ways to label a wall.
Tags sit right on the drawing, next to the thing they name. On a simple wall, they’re the fastest to read.
Keynotes are numbered callouts. The number sits on the drawing, and the text sits in a list beside it. On a busy cabinet wall, keynotes keep the drawing clean.
Use tags on simple walls and keynotes on cabinetry walls. Just never mix both on one sheet. Readers end up hunting.
Tie every tag to your spec sheet
Your elevation tells the tile setter where. Your spec sheet tells them what.
When both documents use the same codes, one glance answers both questions. T2 on the wall is T2 on the sheet. That line holds the product, color, size, and link. Build your spec book around the same codes, and the “which one?” calls dry up.
One designer who tested our Elevations beta told us what she values most. She likes being able to “label the products within the elevation.” She called it “crucial for lighting heights and mirror heights and tile notations.”
Scale and line weight that survive the printer
Interior elevations are usually drawn bigger than your floor plan. Half an inch to the foot or larger is common, because the details are smaller.
Line weight does the rest. Use a heavy line for the wall outline. Use a lighter one for what sits on the wall. Save the lightest for dimensions and hatching.
Then print one sheet. Hold it at arm’s length. Can you read every tag? If not, fix it before it goes out.
Kitchen elevations: cabinet runs, appliances, and millwork
Why do kitchens need your most careful elevations? Because almost every kitchen decision happens up the wall. Cabinets, appliances, the hood, the backsplash, the lighting. A kitchen elevation drawing is where all of it gets settled.
Cabinet runs and the gap under the uppers
Read the cabinet wall from the floor up. Dimension each height you pass:
- Countertop
- Top of backsplash
- Bottom and top of the upper cabinets
- Crown or bulkhead to ceiling
You don’t need to reinvent the numbers. Start from standard kitchen dimensions and adjust for your client.
Then label the faces. Show the door and drawer layout on every cabinet, because that’s what your cabinetmaker prices. Mark fillers and scribe pieces where the run meets a wall. An inch of error on paper becomes a scribe problem on site. Catch it on the drawing, where it’s cheap.
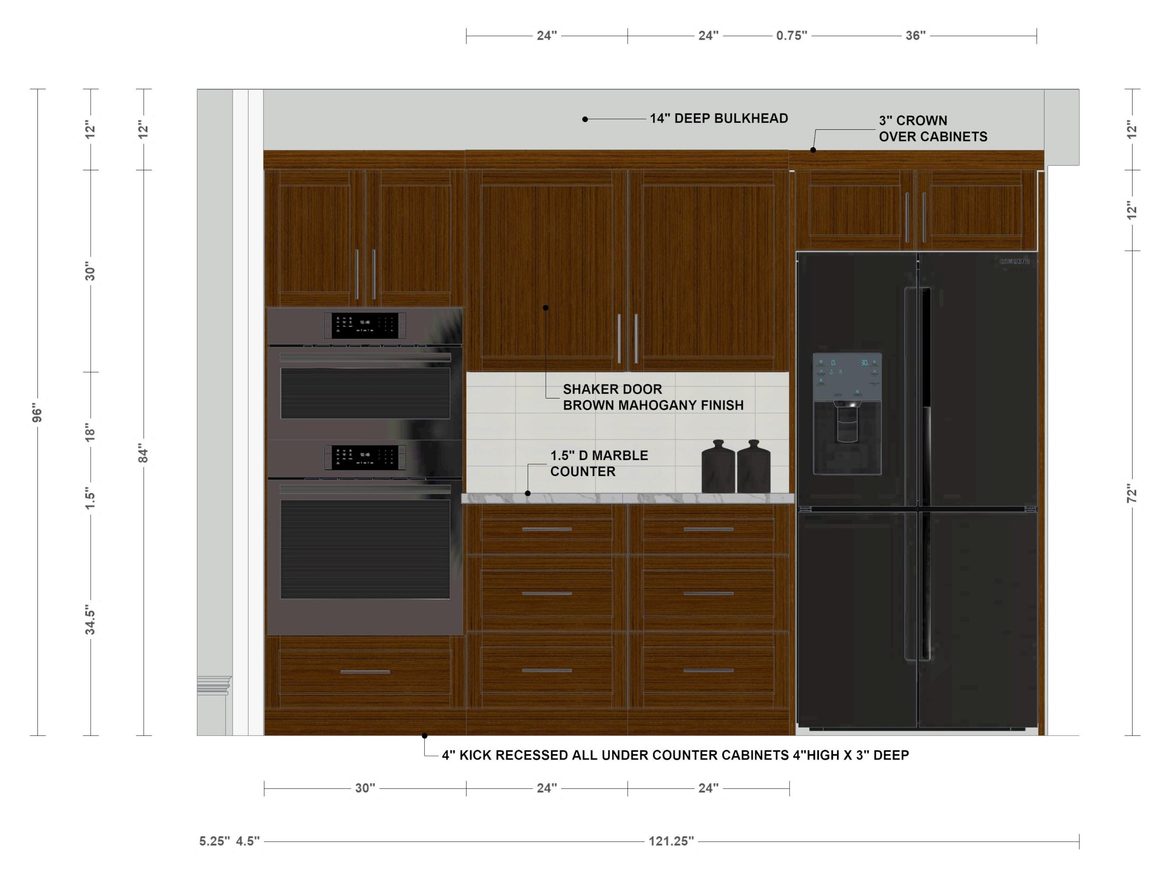
Here’s a full cabinet wall with ovens, pantry, and fridge. Read the left side from the floor up. You’ll see the 34.5″ base, 1.5″ counter, 18″ backsplash, 30″ uppers, and 12″ bulkhead.
Appliance, hood, and outlet heights
Appliances come with install specs. Your elevation should repeat the ones that matter on site.
Get the hood height above the cooktop from the manufacturer’s instructions. Note it on the sheet. Dimension wall oven and microwave stacks to the top of each unit. Place backsplash outlets so they don’t land in the middle of a tile feature.
On this range wall, the hood is dimensioned 24.25″ above the range. The subway tile gets its tag right on the backsplash.
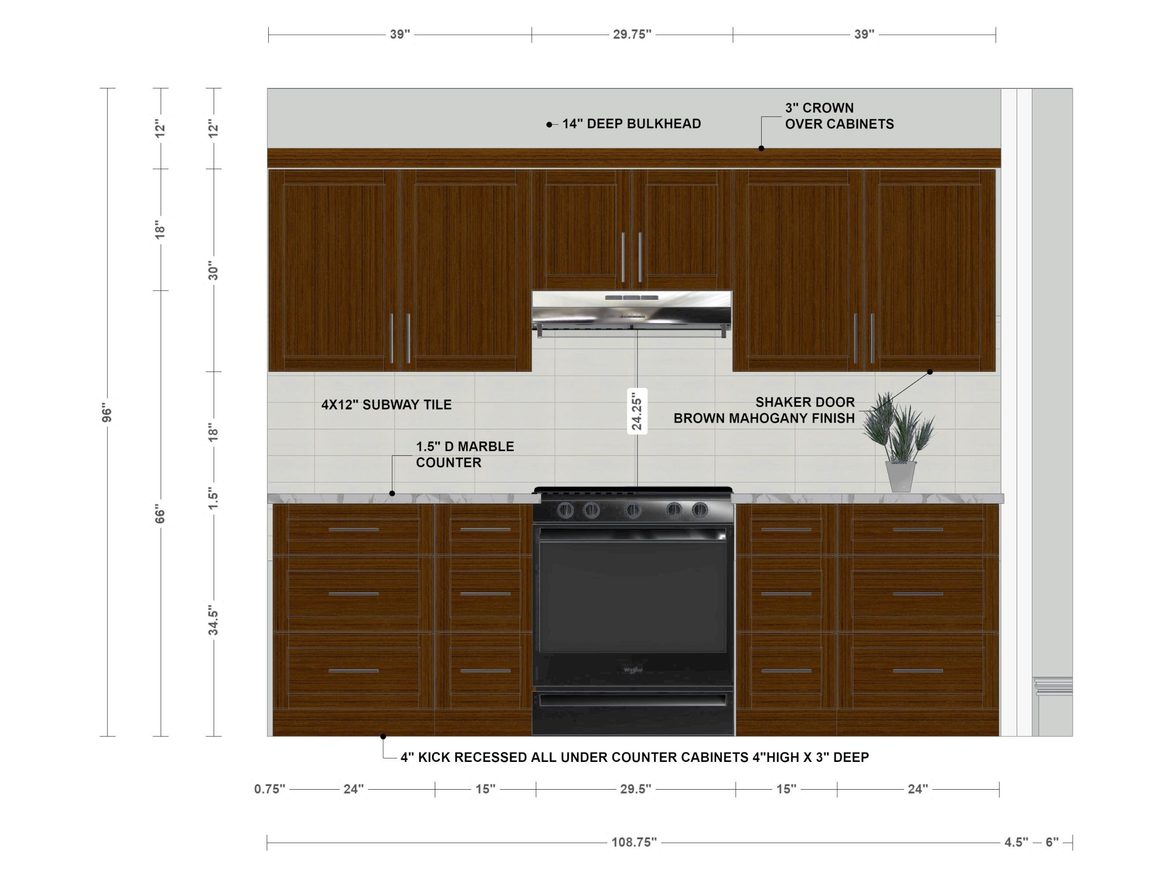
Then there’s depth — the detail that slips through.
“Sometimes designers draw the front of the hood but forget to tell everyone how deep it’s going to be.” — Emily Yeates, Founder, Urban Revival
Luckily, this problem takes just 10 seconds to fix. Write the hood depth as a note, right on the elevation.
Millwork and cabinet elevations for your cabinetmaker
Custom cabinetry raises the stakes. Your cabinetmaker prices the job from your elevation. Then they send back millwork shop drawings for your approval.
To price it without calling you, they need:
- Door and drawer layout, with sizes
- Hardware type and placement
- Panel layout and grain direction
- Finish tags
- Toe kick and crown details
That’s the heart of a good millwork drawing from your side of the table. The shop works out the construction. You set the design intent.
Where depth changes, like a deep pantry beside shallow uppers, add a section. As covered in the depth notes above, one cut saves a round of questions.
Bathroom elevations: vanity, tile and mirror heights
Who reads a bathroom elevation? The plumber, the electrician, the tile setter, and the glass installer. Four trades, one wall. So a bathroom elevation drawing carries more notes per square foot than any other room.
This vanity wall answers all four trades. Read it from the floor up: vanity, counter, tile stop, mirror, and sconces.
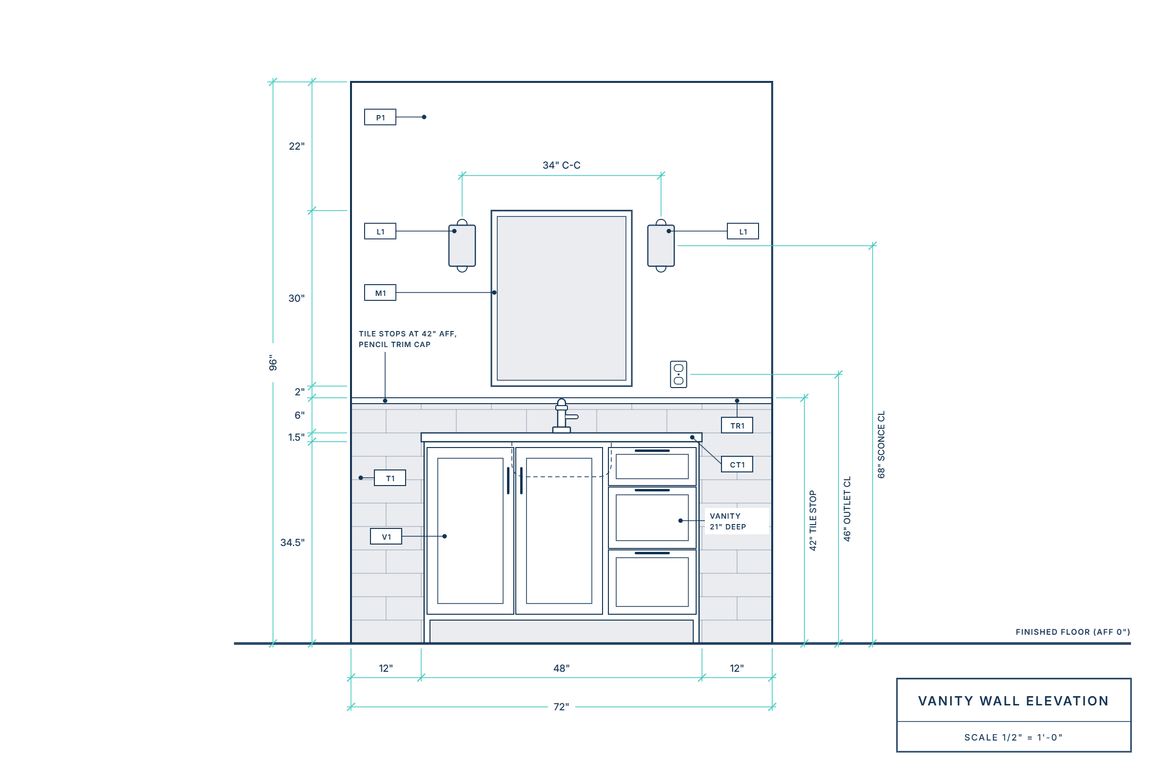
The vanity wall
Start with the vanity height, and note whether it’s standard or comfort height. Then dimension the faucet and drain centers. Add the mirror’s bottom and top, the sconce centers, and the outlet. Medicine cabinet? Dimension its bottom and top as well.
Not sure what your client wants? Ask before you draw. Our bathroom remodel questionnaire pins down height preferences early. A bathroom vanity elevation drawing built on guesses gets redrawn.
Tile layout and where the tile stops
How far does the tile go? You’ll hear that one more than any other bathroom question.
Answer it on the drawing. Show the tile field with its termination height, its edge trim, and its starting course. Mark where full tiles land at visible edges, like a vanity side or window return. Tag the tile, and tag the trim piece separately.
A detailed bathroom elevation drawing shows exactly where the tile stops. Leave that line off, and someone on site picks a spot. It might not be yours.
Shower and glass enclosure elevations
Your shower elevation drawing sets the plumbing heights. Dimension the valve, the head, and the handheld. Then place the niche, with its size, and the bench height. Note which wall the valve sits on, so the plumber doesn’t have to ask.
Draw the glass too. Your glass installer will field-measure. But you set the intent: panel heights, door swing, and the gap to the ceiling. A glass shower stall elevation plan with those three things heads off the usual questions.
The toilet wall
This is the wall that gets skipped. That’s exactly why its heights get guessed on site.
Mark the toilet centerline from the nearest wall. Dimension the grab bars, towel ring, and paper holder. Art or a shelf above the tank? Place that too. A toilet elevation drawing takes minutes, and it saves a hole in the wrong spot. Small wall, small effort, real payoff.
Fireplace and built-in elevations
Fireplace walls and built-ins do double duty. They’re construction drawings, and they’re the elevations your client falls for.
Fireplace walls
A fireplace elevation drawing starts with the firebox opening. Then dimension the surround, the hearth, and the mantel height. The mantel’s depth goes in a note. Stone and tile surrounds get their own tags, too.
Place anything above it, like a TV or large art, by its center height. Show flanking built-ins or sconces on the same sheet.
Clearances around a fireplace come from the manufacturer and your local code. Confirm them with the manufacturer and your contractor. Then write the source on the sheet, so nobody second-guesses the number later.
This fireplace wall has built-ins on each side. Look for the mantel depth note and the shelf heights. Each finish has its own tag.
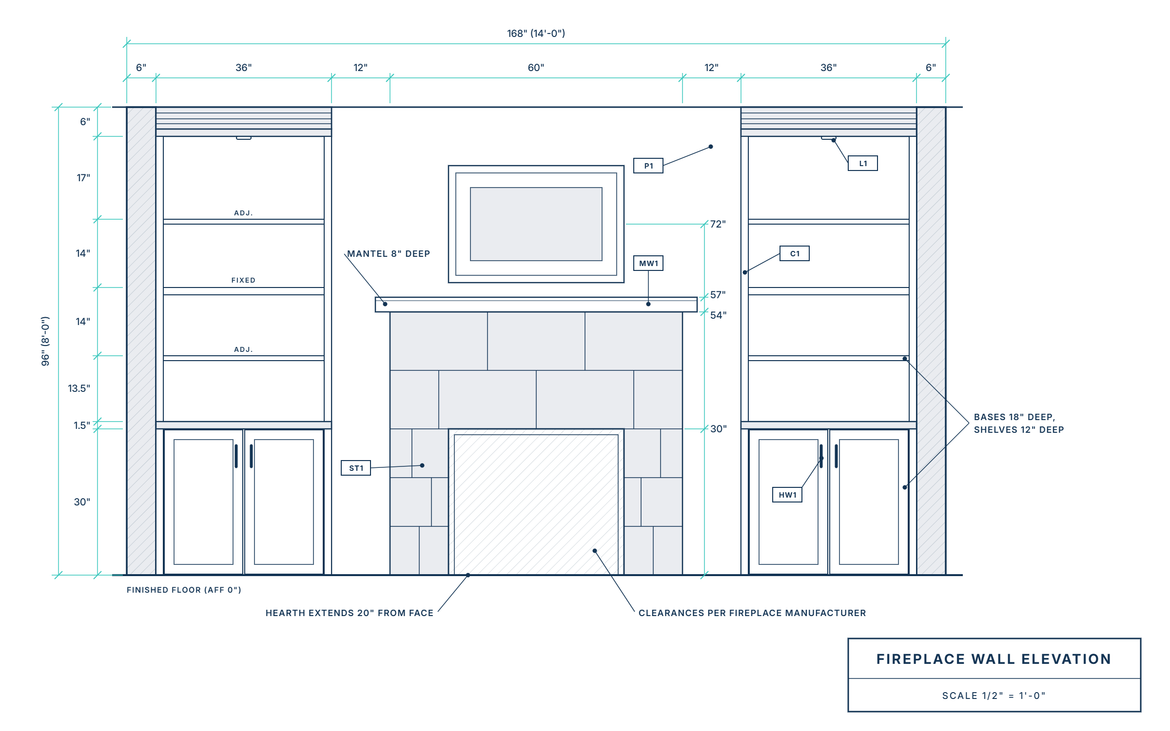
Built-ins, bookcases and window seats
Built-ins are where your client starts reading elevations as design.
Show shelf spacing, and note which shelves are fixed and which adjust. Mark where closed cabinet bases end, and open shelving begins. Place any lighting inside the built-in, and tag the hardware.
That level of detail does more than guide the shop.
“Clients need to see the progression of projects all the way through. Show them and say, this is how we depict our built-ins, and you can see how much detail is going into this, and this is what the contractor gets and builds off.” — Kimberly Horton, Luxury Residential Interior Designer, Founder, House of Savoy
So put a built-in elevation in your next presentation. It shows your client how much thinking sits behind the fee.
Interior elevation templates you can copy
You don’t need to start from a blank sheet. Here are three starting layouts, each with the heights and tags to fill in. Pick one. Then build your elevation from the template in DesignFiles, from your 3D room. You’ll draw these walls again and again.
Kitchen run template
Start here for any kitchen. One full cabinet wall: base run, uppers, hood and backsplash. Fill in:
- Finished floor datum
- Counter height and backsplash top
- Upper cabinet bottom and top
- Hood bottom, plus a depth note
- Door and drawer layout
- Tags for cabinets, counter and backsplash
Vanity wall template
Start here for any bath. A vanity, a mirror, two sconces, an outlet, and a tile field. Fill in:
- Vanity height, standard or comfort
- Faucet center
- Mirror bottom and top
- Sconce centers and outlet height
- Tile stop and edge trim
- Tags for vanity, counter, tile, and paint
Built-in wall template
A fireplace or media wall with shelves on each side. This interior elevation drawing template covers:
- Opening and mantel height, plus a mantel depth note
- Shelf spacing, fixed or adjustable
- Base cabinet height
- Lighting inside the built-in
- Hardware tags
- Tags for paint, stone, and wood
Want it all on one page? Here’s every height to dimension, sorted by room.
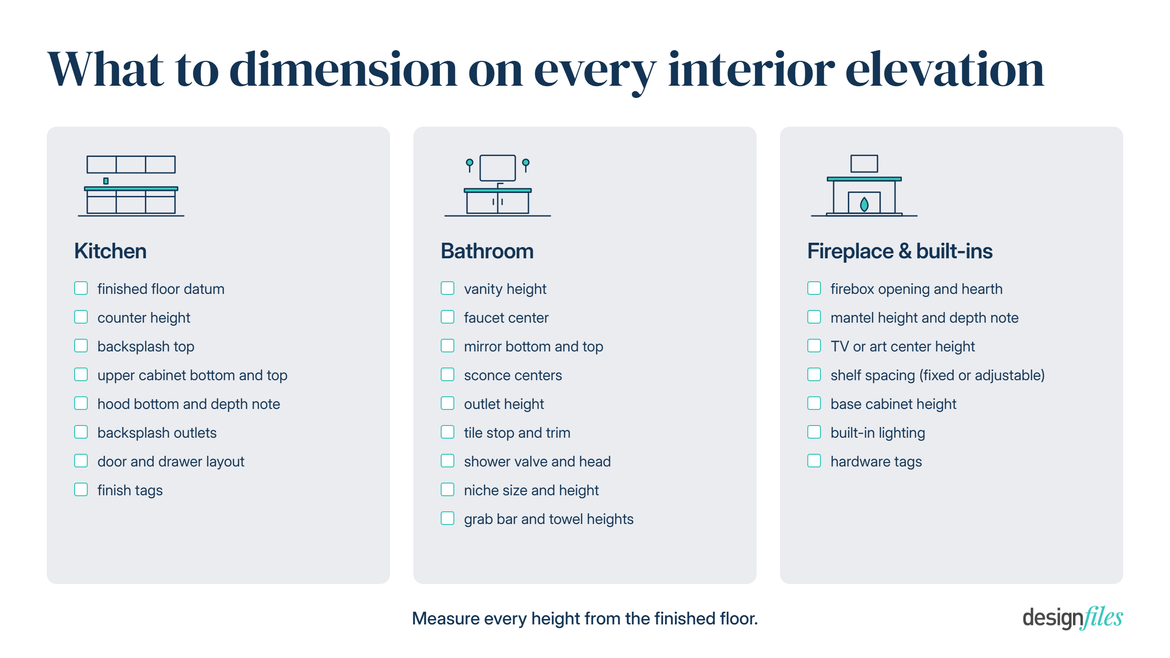
Handing interior elevations to your GC and cabinetmaker
Not sure which drawings a job needs? Our guide sorts out which drawings your contractor actually needs by project type. This section covers what happens after you hit send.
What your GC reads first
Send your elevations with your spec book, never on their own. That way every tag resolves on the same page.
Then walk your GC through them at the pre-construction meeting, one wall at a time. A question asked across a table costs less than one asked on site.
Keep drawings and specs in one project. Your GC gets one link, not a pile of attachments.
In one of my workshops, Emily Yeates of Urban Revival shared a habit I love. For years, she logged every question a builder or contractor called her with. Each one went onto a master checklist. The next project answered it before anyone asked. Your elevation notes are where that checklist pays off. They sit on the wall the trade is looking at.
What your cabinetmaker sends back
For custom cabinetry, your elevation is the starting point. Your cabinetmaker turns it into shop drawings, their own fabrication-ready version. Your job is to approve them. Expect at least one round of revisions. That’s normal.
Check these first:
- Overall dimensions against your elevation
- Door and drawer layout
- Finishes and hardware
- Any spot where depth changes
Catch a mismatch here, and it’s an email. Catch it after install, and it’s a remake. For the bigger picture, see our guide to working with contractors.
Drawing interior elevations in DesignFiles
Already built the room in the 3D Floor Planner? Then you’ve done the hard part.
DesignFiles creates your interior elevations from that same 3D design. There’s no second drafting pass, and no exporting to SketchUp. No CAD license required, either.
Here’s the flow. Place an elevation marker on your plan for each wall. Open each elevation. Add your finish tags and numbered callouts, and check every height. Our How to Create Elevations tutorial walks through each step.
Here’s what placing markers looks like. Drop one on each wall, and DesignFiles builds that wall’s elevation from your 3D design.
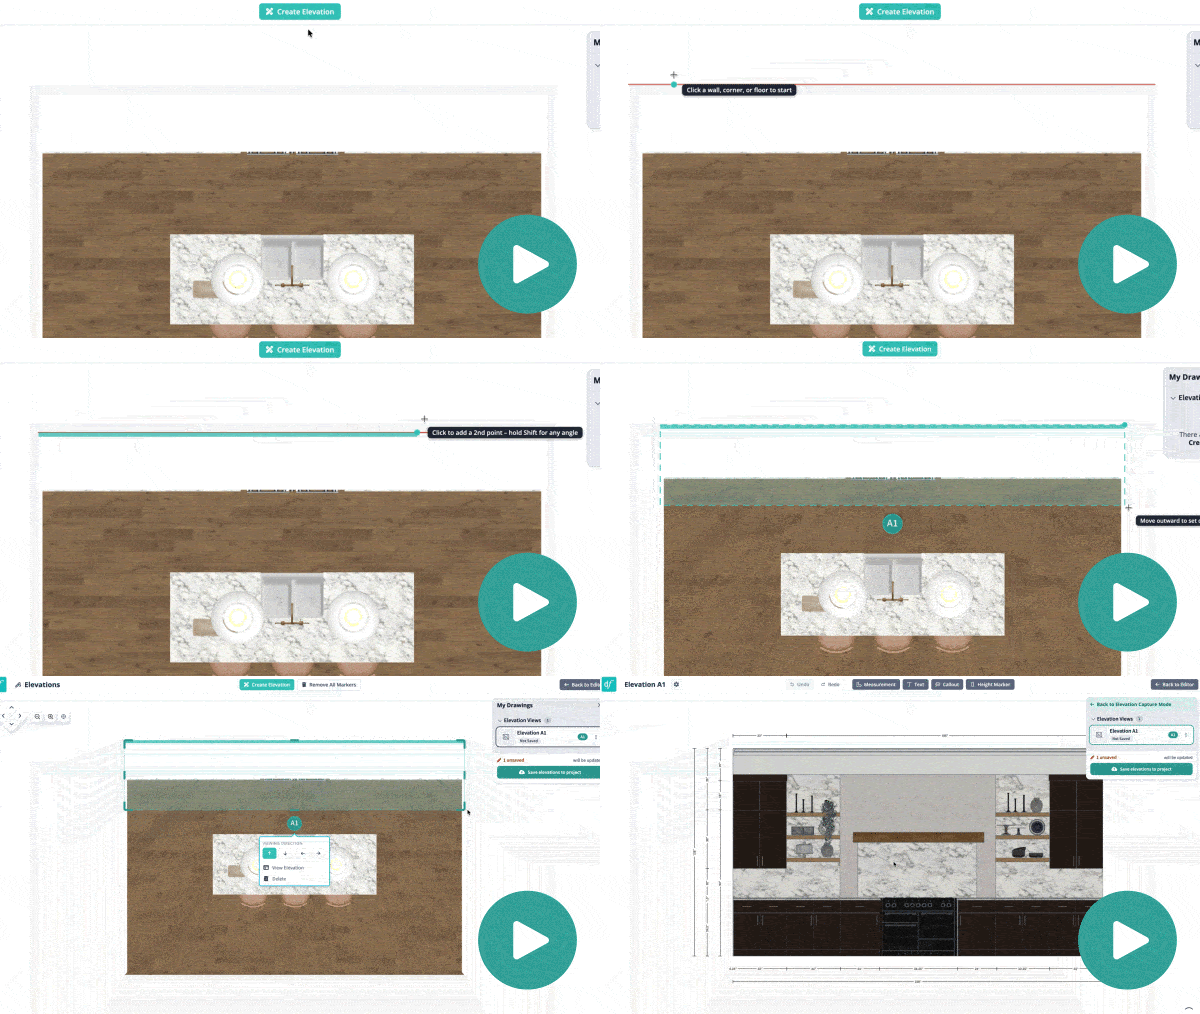
That matters when you’re juggling three projects at once. Every hour you skip redrafting in CAD is an hour back for design. Your elevations also live in the same project as your spec sheets. Tags and specs stay side by side.
And here’s an elevation mid-edit. The toolbar across the top holds the measurement, text, callout and height marker tools.
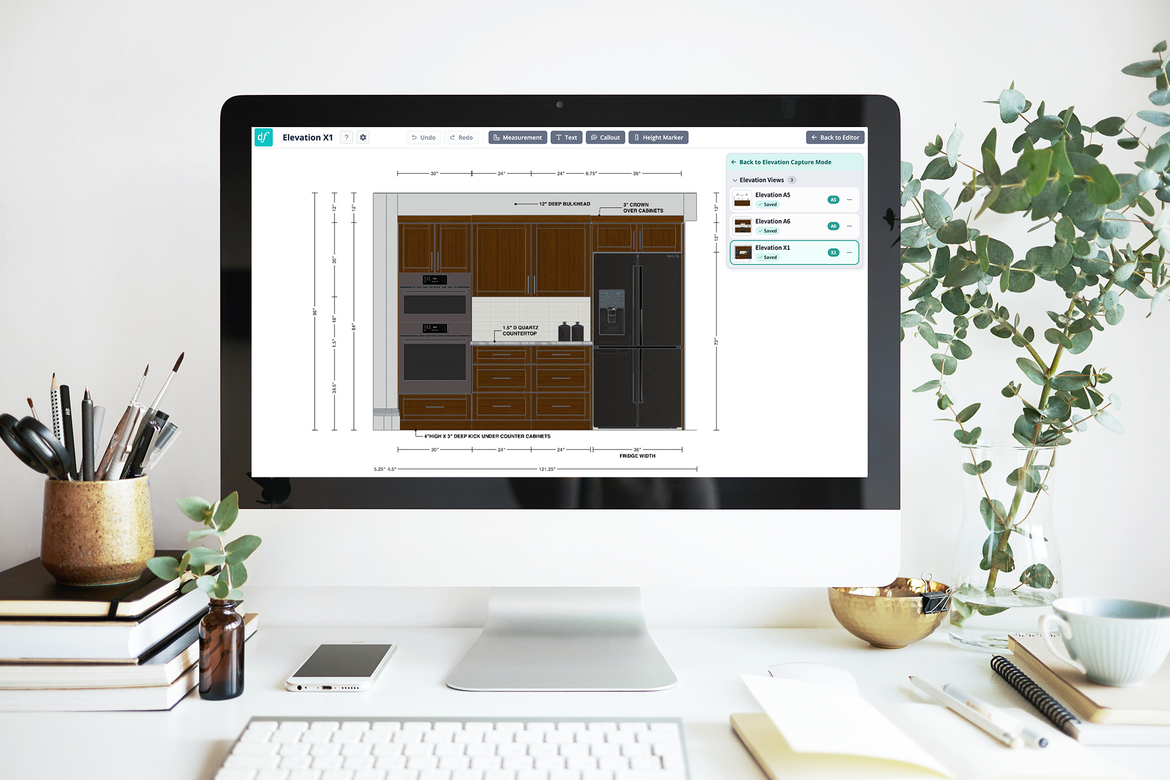
The early feedback was clear (DesignFiles Elevations beta survey, 2026). In our beta, 12 of 13 designers (92%) called it ready for live client work.
Comparing tools first? See our roundup of elevation drawing software.
Already built the room in 3D? Try DesignFiles Elevations on a wall you’re about to hand off.
Interior elevation drawings FAQs
It’s a flat, scaled drawing of one wall inside a room, viewed straight on. There’s no perspective, so you can measure any height right off the page. It shows cabinets, fixtures, tile, trim, and finishes, with dimensions and tags. Each one is keyed to the floor plan by a marker. Trades use it to see exactly how high things go and what they’re finished in.
Measure every height from one stated datum, usually the finished floor. Keep one scale per sheet, and go larger for interiors than for floor plans. Use line weight to separate the wall, what’s on it, and the dimensions. Pick one labeling system for each sheet. And make sure every tag matches a line on your spec sheet.
Exterior and interior. Exterior elevations show the outside faces of a building. They’re labeled by compass direction, or as front, rear, and sides. Your architect usually draws those. Interior elevations show single walls inside a room, like a kitchen run. They carry your design decisions, so they’re the ones you’ll draw.
It’s a wall-by-wall drawing of the vertical side of your design. Your floor plan shows where things go. The elevation shows how high they sit and what they’re made of. Your cabinetmaker, electrician, plumber, and tile setter all build from it. It also shines in a client presentation, because it shows the detail behind the design.
DesignFiles is all-in-one interior design software that offers simplified moodboards, 3D floor plans, project management, client management, and invoicing. Try it free for one project with no time limit. Our platform is rated 4.6 stars out of 5 on Capterra.
If you want to see how DesignFiles can transform your business, book a 1-on-1 demo with our team.

![2027 Interior Design Conferences & Tradeshows [Ultimate List]](https://blog.designfiles.co/wp-content/uploads/2024/11/interior-design-events-768x512.jpeg)