An interior design presentation is a structured slide deck that communicates your concept, layout, finishes, timeline, and budget to your client. It’s the moment where your ideas move from your head onto the page in a way that feels clear, organized, and easy to approve.
A strong interior design presentation usually includes a project overview, design direction, color palette, materials and finishes, floor plans, lighting plans, elevations, a project timeline, and a budget breakdown. When these interior design presentation slides are arranged in a thoughtful order, they tell a cohesive story and guide your client confidently from big-picture vision to practical next steps.
If you’ve ever wondered how to create an interior design presentation that feels polished, professional, and persuasive, you’re in the right place.
In this guide, we’ll walk through exactly what to put in your interior design presentation, share a clear interior design presentation example for each section, and give you access to an interior design presentation template you can customize for your own projects.
Whether you’re presenting in person or sending a digital deck for review, this structure will help you feel confident, prepared, and completely in control.
Table of Contents
What to put in your interior design presentation [with example slides!]
A polished interior design presentation flows like a story, starting with a strong first impression and guiding your client step-by-step through the vision. Below, we’ll break down each essential slide and show you exactly what to include, along with how our template lays it out beautifully for you.
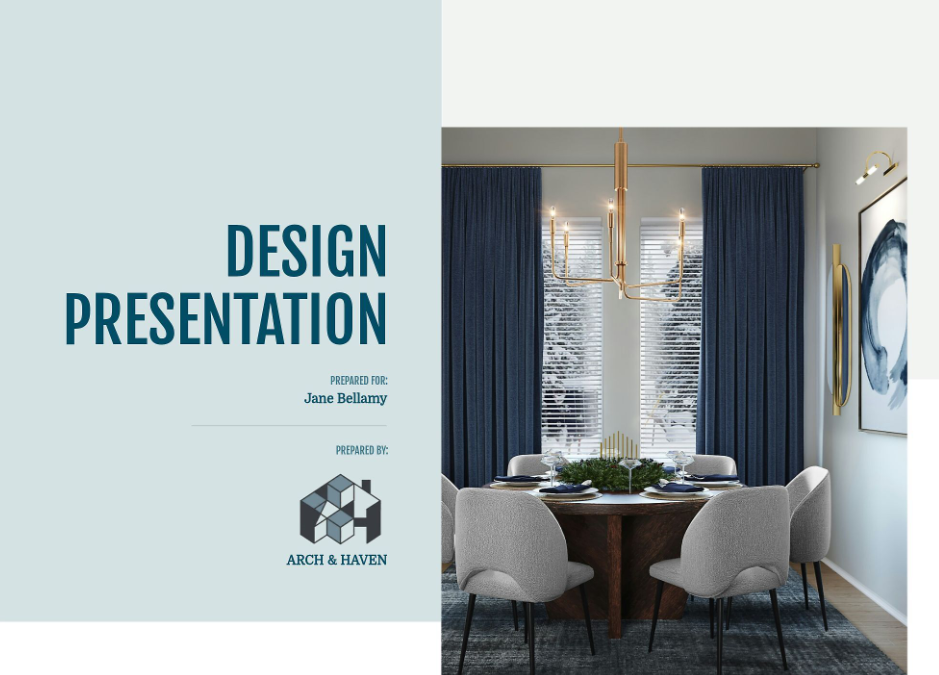
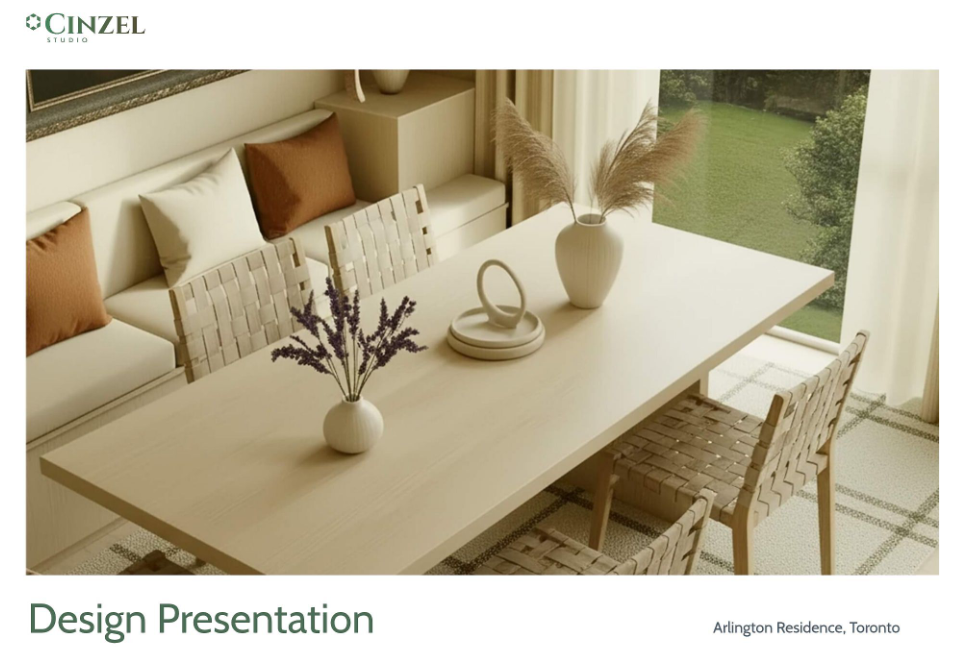
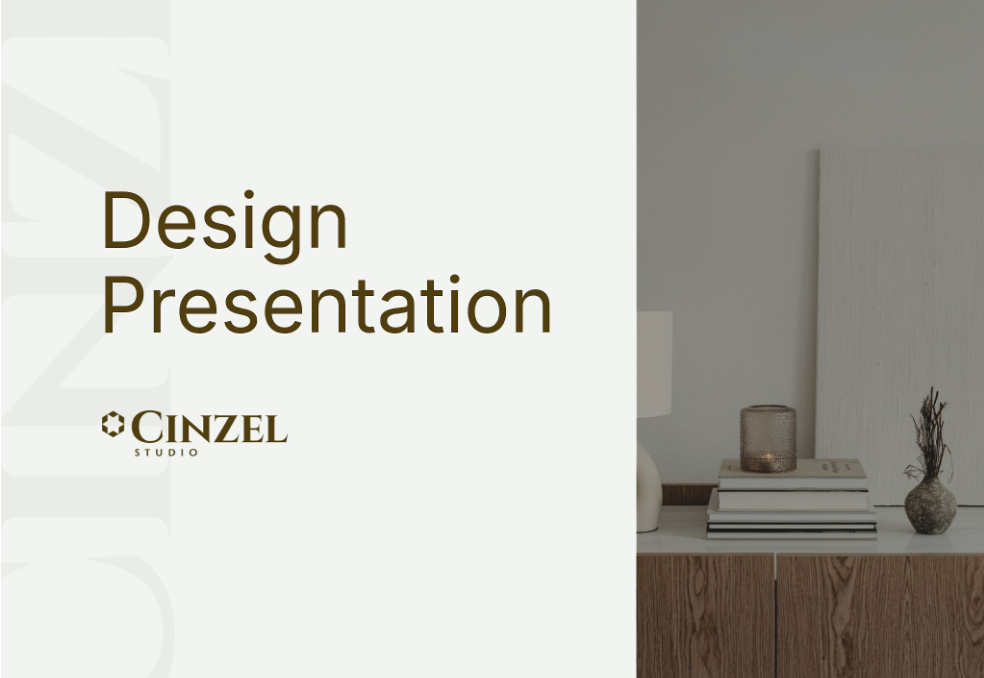
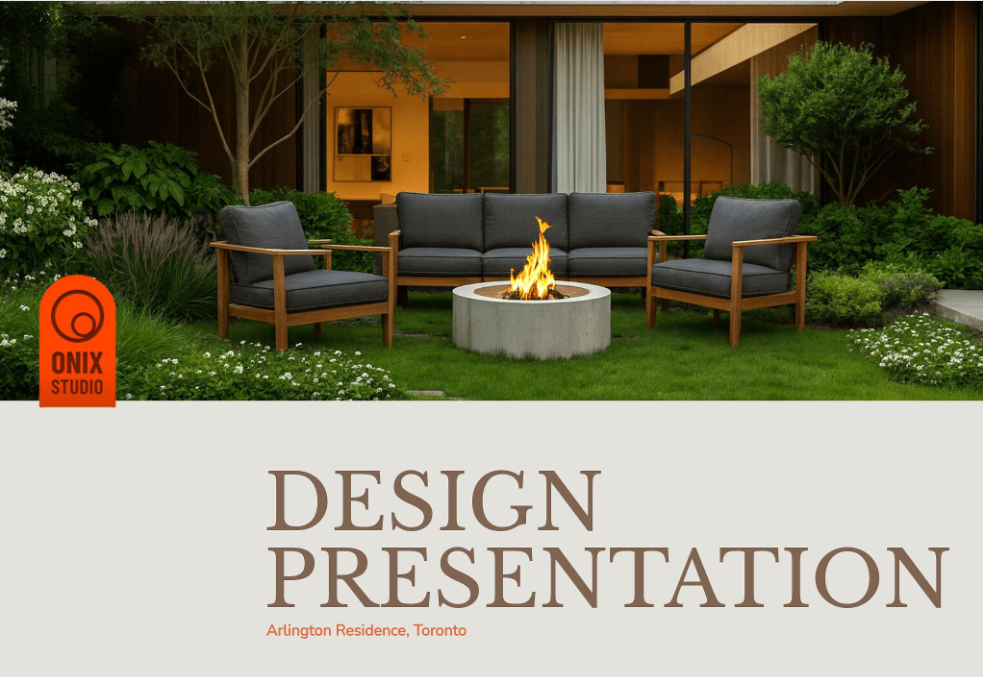
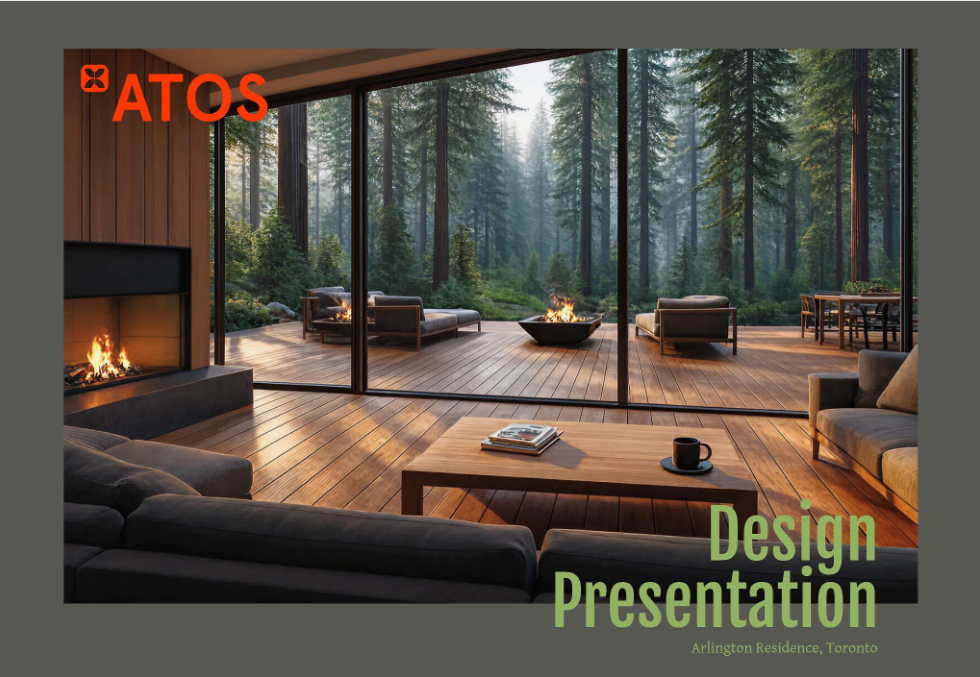
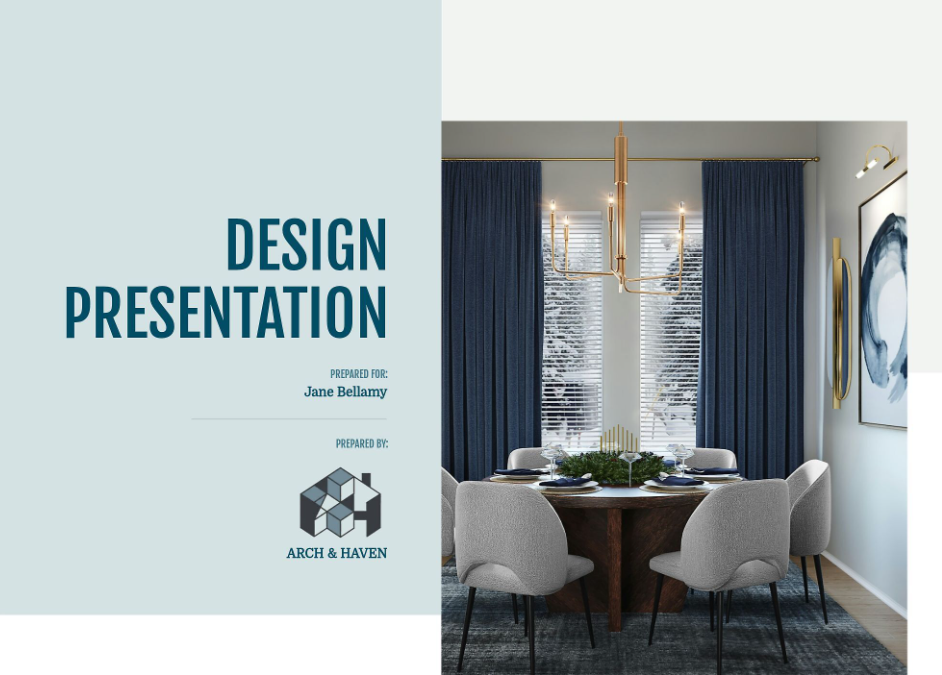
1. Cover Slide
Your cover slide sets the tone for the entire presentation. It should feel elevated, intentional, and unmistakably on brand. Think of it as your runway moment — clean, confident, and visually aligned with the design direction to come.
In general, your cover slide should include:
- The project title (ex: “Dining Room Design Presentation”)
- The client’s name
- Your business name and logo
- The presentation date (optional but helpful)
- A high-impact hero image that reflects the overall aesthetic
In our template, the layout is split for a modern, editorial feel. The left side features bold typography with a soft, calming background color that feels refined and welcoming. The right side showcases a full-height design render that instantly immerses your client in the vision. Subtle details — like centered alignment, balanced spacing, and clean branding placement — give it that polished, professional finish without feeling busy.
It’s simple. It’s elegant. And it immediately signals: You’re in good hands.
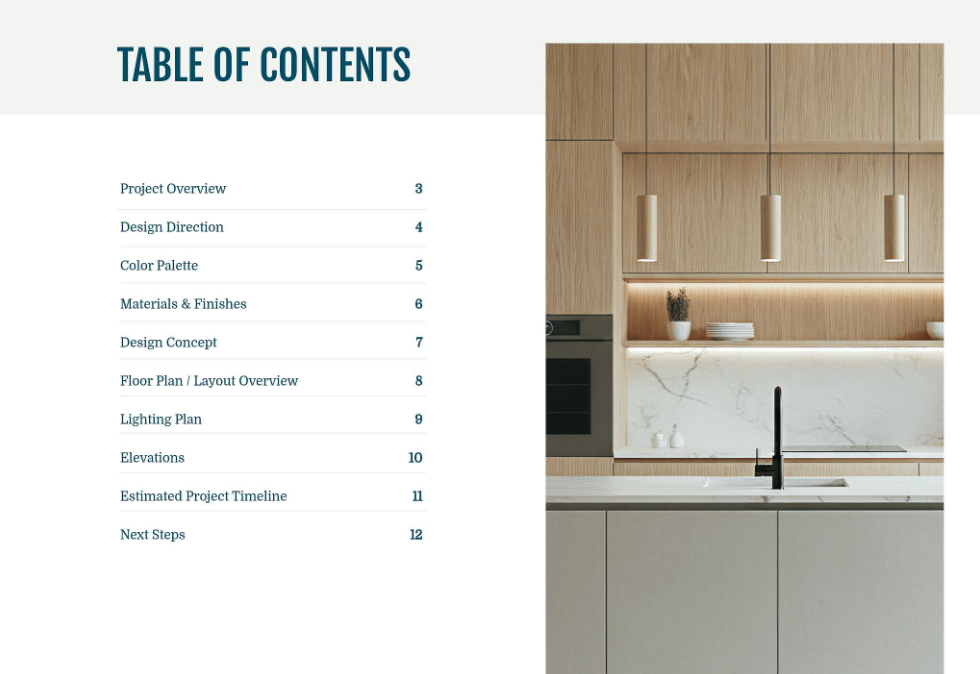
2. Table of Contents
A table of contents brings instant clarity to your interior design presentation. It shows your client that there is a thoughtful structure behind the beauty. Instead of wondering what comes next, they can relax and follow along confidently. This slide reinforces your professionalism and makes your presentation feel intentional and complete.
In general, your table of contents should:
- List each major section of the presentation in order
- Use clear, simple wording that matches your slide titles
- Include page numbers for easy reference
- Maintain consistent fonts and spacing
In our template, the layout feels clean and editorial. The left side neatly lists each section with aligned page numbers for a polished look. The right side features a warm, minimal kitchen image that subtly reflects the design tone. It is organized, elevated, and easy to follow, which sets the stage for a smooth and confident presentation experience.
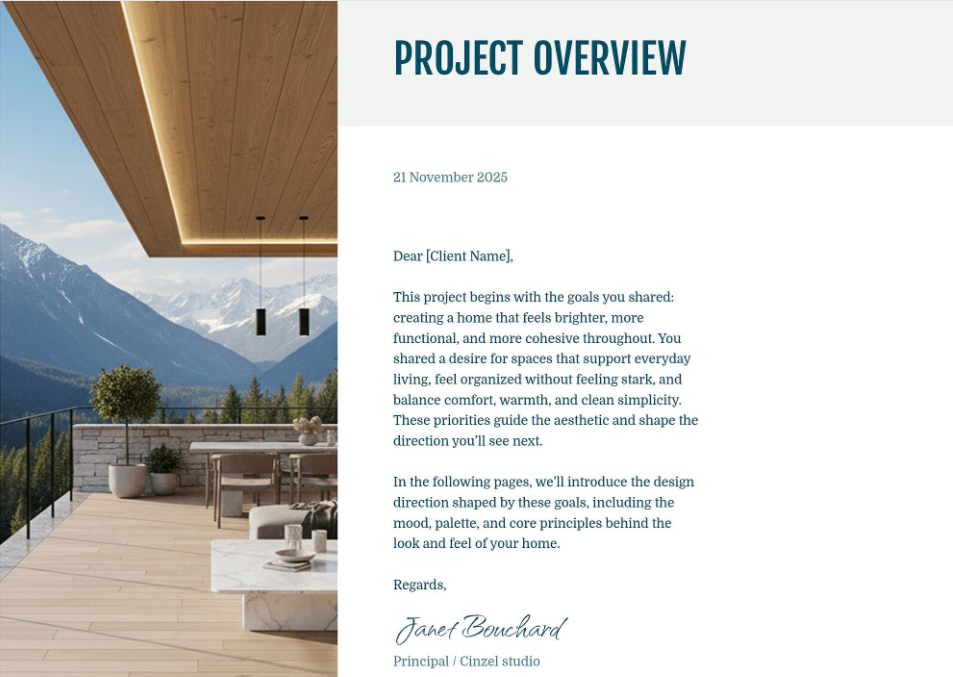
3. Project Overview
The project overview is where you show your client that you have been listening. This slide reconnects the design to their goals, lifestyle, and priorities before you dive into visuals. It builds trust and reminds them that every decision you are about to present is rooted in what they shared with you.
In general, your project overview should:
- Restate the client’s main goals and pain points
- Highlight the desired feeling or transformation
- Set expectations for what the presentation will cover
- Reinforce your role as the guide throughout the process
In our template, this slide reads like a personal letter. The layout pairs a stunning architectural image on the left with a clean, well-spaced message on the right. The date, client name, and signature add a refined, bespoke touch. It feels thoughtful, professional, and warm, which is exactly how a great project should begin.
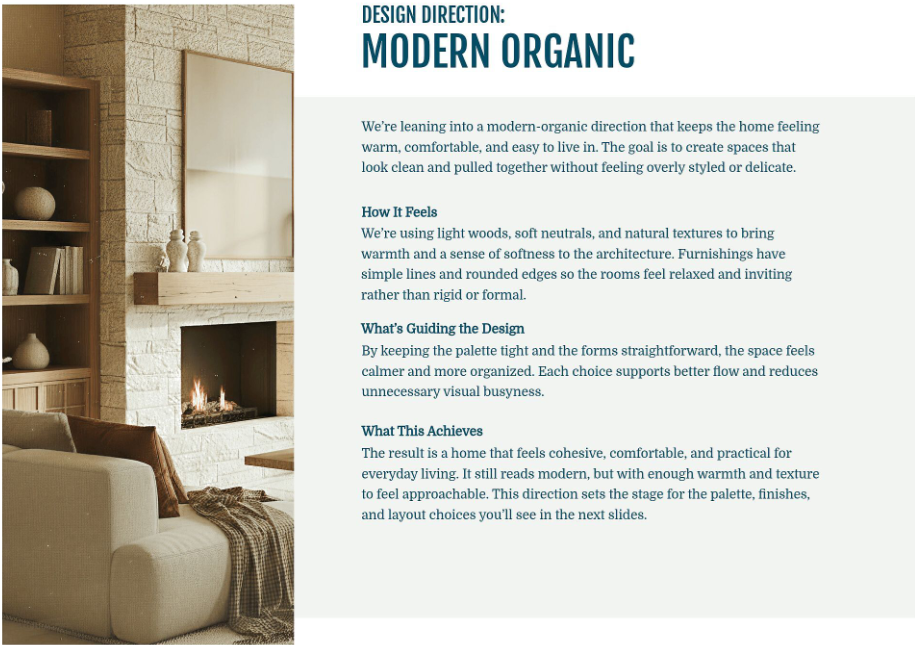
4. Design Direction
The design direction slide defines the heart of the project. This is where you clearly name the aesthetic approach and explain how it connects to your client’s goals. It moves the presentation from practical details into creative intention. When done well, it helps your client emotionally connect to the vision before you dive into palettes, layouts, and specifications.
In general, your design direction slide should:
- Clearly state the chosen aesthetic or style direction
- Describe how the space should feel
- Explain the principles guiding your design decisions
- Connect the look back to the client’s lifestyle and priorities
In our template, the direction is boldly titled at the top for instant clarity. A warm, inviting image anchors the left side, while the right side walks through the feeling, guiding principles, and end result in beautifully spaced sections. It feels intentional, elevated, and easy to understand, which makes your creative vision feel confident and cohesive from the start.
5. Color Palette
Your color palette slide brings emotional clarity to the design. This is where clients begin to truly feel the atmosphere of their future space. Color influences mood, light reflection, and how cohesive the home feels from room to room. Presenting it clearly builds confidence and shows that every shade has been thoughtfully selected.
In general, your color palette slide should:
- Showcase your primary and secondary colors
- Include exact paint names and brand references
- Reflect how the tones work together
- Reinforce the overall design direction
In our template, the palette is displayed in large, clean swatches with labeled paint names and codes beneath each one. The layout feels airy and balanced, while the soft neutral tones create a calm, welcoming impression. A subtle header image at the top ties everything together and reinforces the warmth and cohesion of the selected colors.

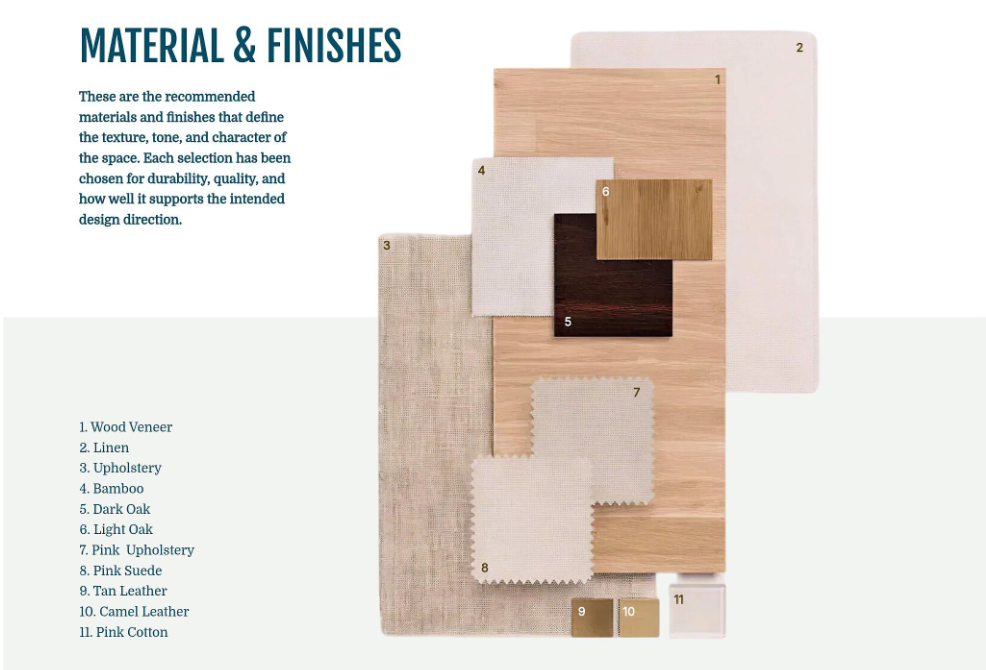
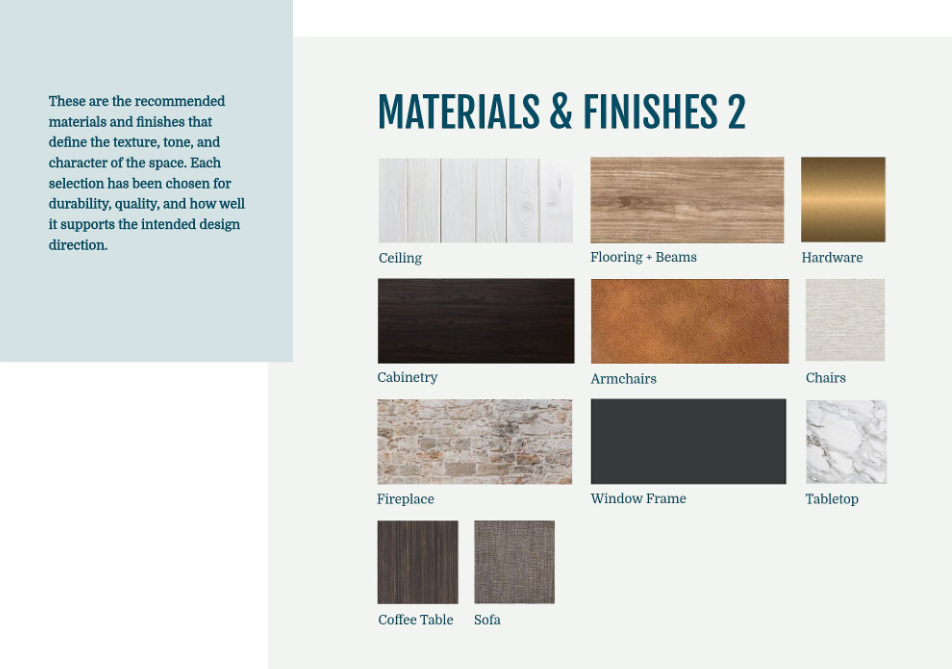
6. Materials & Finishes
The materials and finishes slide is where your design truly becomes tangible. This is where texture, durability, and quality come into focus. Clients are not just approving a look. They are approving surfaces they will touch every day. Presenting this clearly shows that your selections are both beautiful and practical.
In general, your materials and finishes slide should:
- Showcase key surfaces such as flooring, cabinetry, hardware, and upholstery
- Label each material clearly
- Highlight how textures work together
- Reinforce durability and functionality
In our templates, you have two elegant layout options. One organizes materials by application, such as ceiling, flooring, cabinetry, and furniture, for a structured and easy-to-follow presentation. The other layers physical swatches in a styled flat lay with numbered references and a corresponding material list. Both approaches feel elevated and intentional, helping clients visualize how every texture contributes to a cohesive final result.
7. Design Concept
The design concept slide is where everything starts to come together visually. While your design direction explained the feeling in words, this slide shows it. It combines furniture, lighting, decor, and finishes into one cohesive composition so your client can clearly picture how the space will look and function.
In general, your design concept slide should:
- Feature key furniture selections
- Include accent pieces and styling elements
- Reflect the approved color palette
- Demonstrate balance, scale, and proportion
In our template, the layout feels clean and curated, almost like a boutique showroom moment. Larger anchor pieces such as the sofa and chairs ground the composition, while lighting, tables, textiles, and accessories layer in warmth and personality. A vertical strip of color swatches ties everything back to the palette, reinforcing cohesion. It feels polished, intentional, and beautifully pulled together.

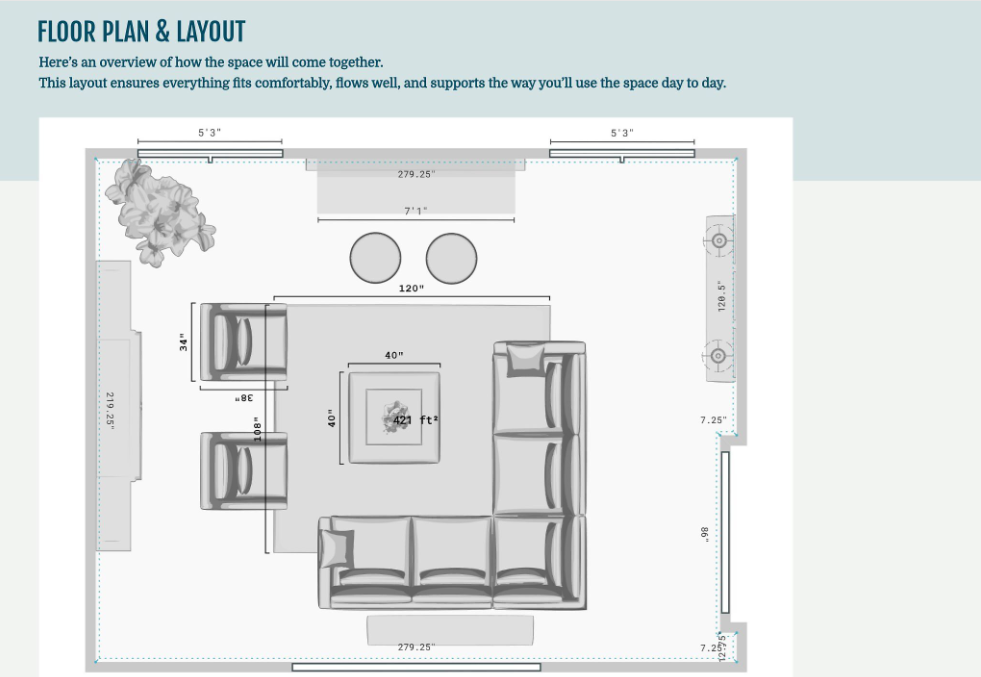
8. Floor Plan / Layout Overview
The floor plan or layout overview slide shows how the design works in real life. This is where beauty meets function. Clients can clearly see how furniture fits, how traffic flows, and how the space supports everyday living. A strong layout builds confidence because it proves the design is not just pretty, it is practical.
In general, your floor plan slide should:
- Show accurate room dimensions
- Include scaled furniture placement
- Highlight key focal points
- Demonstrate comfortable circulation paths
In our template, the layout is clean and easy to read, with measurements clearly labeled for transparency. The furniture arrangement is thoughtfully positioned to create balance and conversation areas while maintaining open walkways. The soft background header keeps the page feeling polished and cohesive with the rest of the presentation. It feels organized, intentional, and fully thought through.
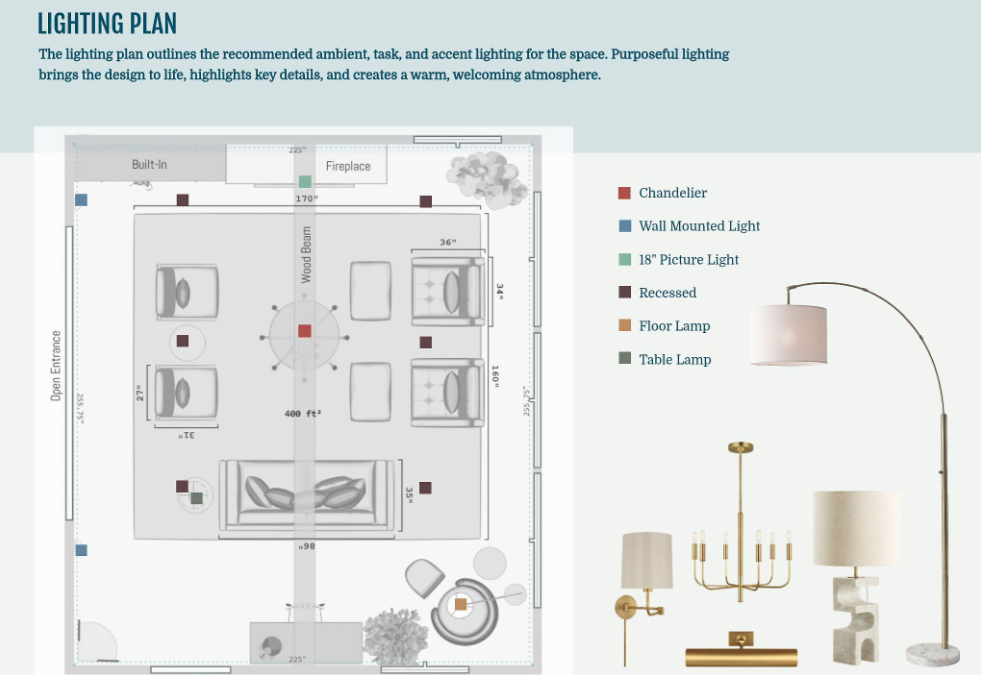
9. Lighting Plan
The lighting plan slide shows how the space will truly come alive. Lighting is not just functional. It shapes mood, highlights architectural details, and creates warmth throughout the day and into the evening. A thoughtful lighting plan reassures your client that every layer has been considered, from ambient glow to task lighting.
In general, your lighting plan slide should:
- Identify ambient, task, and accent lighting
- Show fixture placement directly on the floor plan
- Include a clear legend for easy reference
- Feature the selected fixtures for visual context
In our template, the floor plan includes color coded markers that correspond to a clean legend on the side. Each lighting type is clearly labeled, making it simple to understand placement and purpose. On the right, curated fixture images add personality and polish. The layout feels organized, elevated, and easy to follow, giving clients complete clarity and confidence.
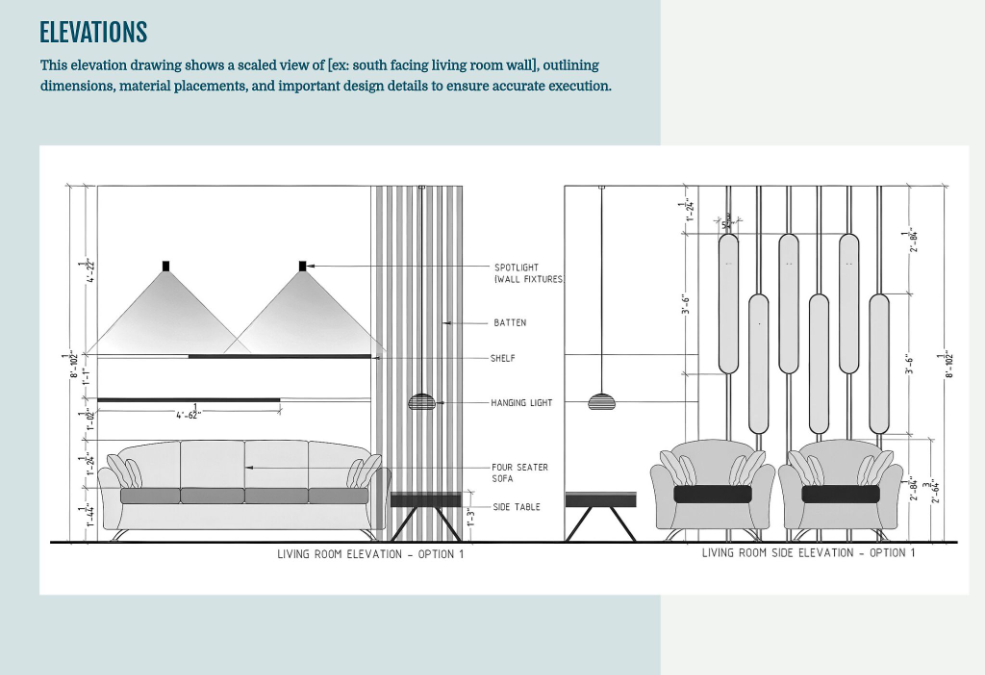
10. Elevations
The elevations slide shows the vertical story of the space. While the floor plan explains layout from above, elevations reveal how elements align on the wall, how lighting interacts with furniture, and how architectural details come together. This slide adds precision and reassures your client that scale, height, and placement have all been carefully considered.
In general, your elevations slide should:
- Present scaled wall views
- Include key dimensions and height callouts
- Identify lighting, millwork, and feature details
- Clarify material placements
In our template, the elevations are clean, technical, and easy to read without feeling overwhelming. Clear dimension lines frame each drawing, while labeled elements highlight shelving, sconces, paneling, and furniture placement. The balanced layout keeps everything organized and polished. It feels professional and detail driven, which gives clients confidence that the final installation will look exactly as envisioned.
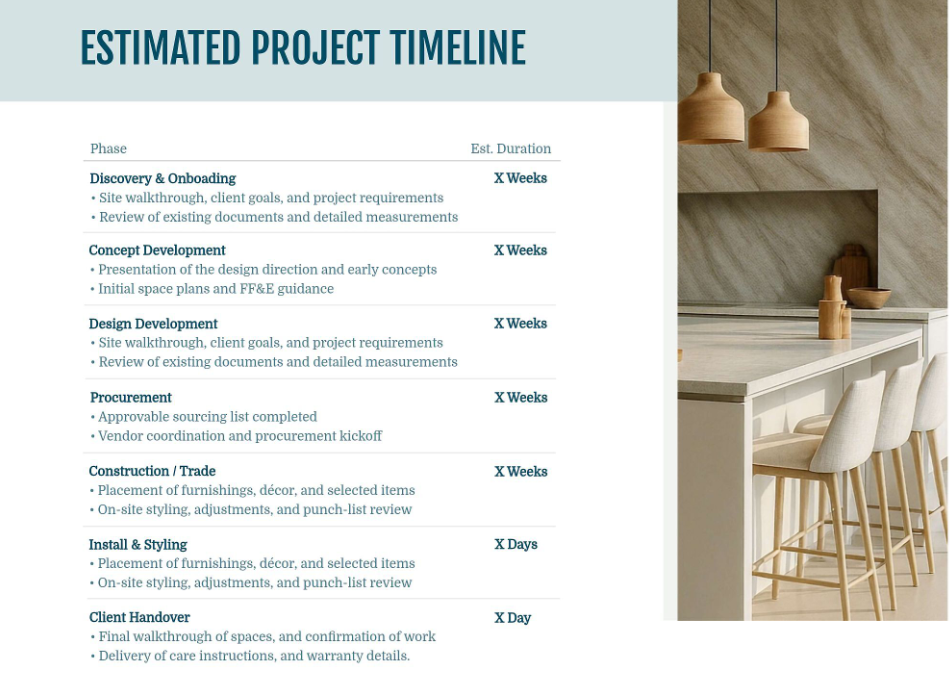
11. Estimated Project Timeline
The estimated project timeline slide gives your client clarity and peace of mind. It outlines how the project will unfold from start to finish, helping them understand what happens when and how long each phase may take. A clear timeline sets expectations early and positions you as organized, proactive, and in control of the process.
In general, your timeline slide should:
- Break the project into clear phases
- Include estimated durations for each stage
- Briefly describe what happens during each phase
- Show the journey from discovery to final handover
In our template, the timeline is structured in a clean two column format with phases on the left and estimated durations on the right. Each stage includes concise bullet points explaining key tasks, which makes it easy to follow. The accompanying lifestyle image keeps the slide warm and inviting while maintaining a polished, professional feel.
12. Budget
The budget slide is where transparency builds trust. This is your opportunity to clearly outline investment expectations and show how the design aligns with your client’s financial comfort zone. When presented confidently and clearly, the budget becomes a collaborative conversation rather than a stressful surprise.
In general, your budget section should:
- Break down costs by category such as furniture, materials, labor, and design fees
- Clarify what is estimated versus fixed
- Note any allowances for items still being finalized
- Explain payment structure and milestone schedules
Keep your formatting clean and easy to scan. Avoid overwhelming clients with unnecessary line items during the presentation. Focus on clarity and alignment.
Wrap this section by reinforcing value. Remind your client that each investment supports quality, longevity, and a cohesive result. Confidence here helps them feel secure saying yes.
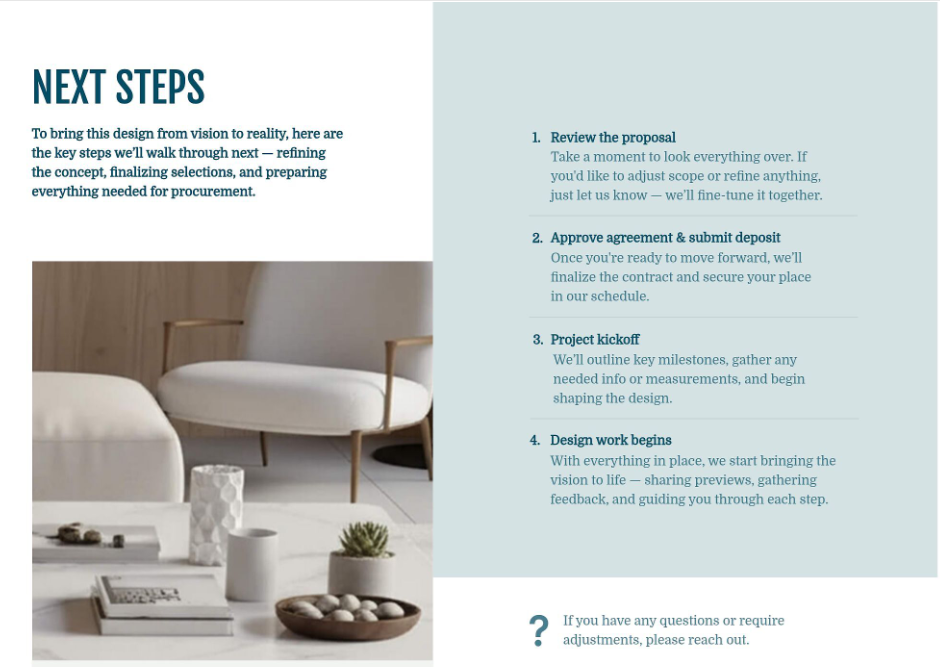
13. Next Steps
The next steps slide brings clarity and momentum. After walking through the full interior design presentation, your client should feel excited and aligned. This slide channels that energy into action. It outlines exactly what happens next so there is no confusion about how the project moves from approval to execution.
In general, your next steps slide should:
- Invite the client to review and share final feedback
- Outline contract approval and deposit details
- Clarify kickoff timing and milestones
- Reassure them that you will guide each phase
In our template, the layout is clean and structured with clearly numbered steps on the right for easy reading. Each phase includes a short explanation so expectations feel transparent and calm. A warm lifestyle image balances the page visually, keeping the tone elevated and welcoming.
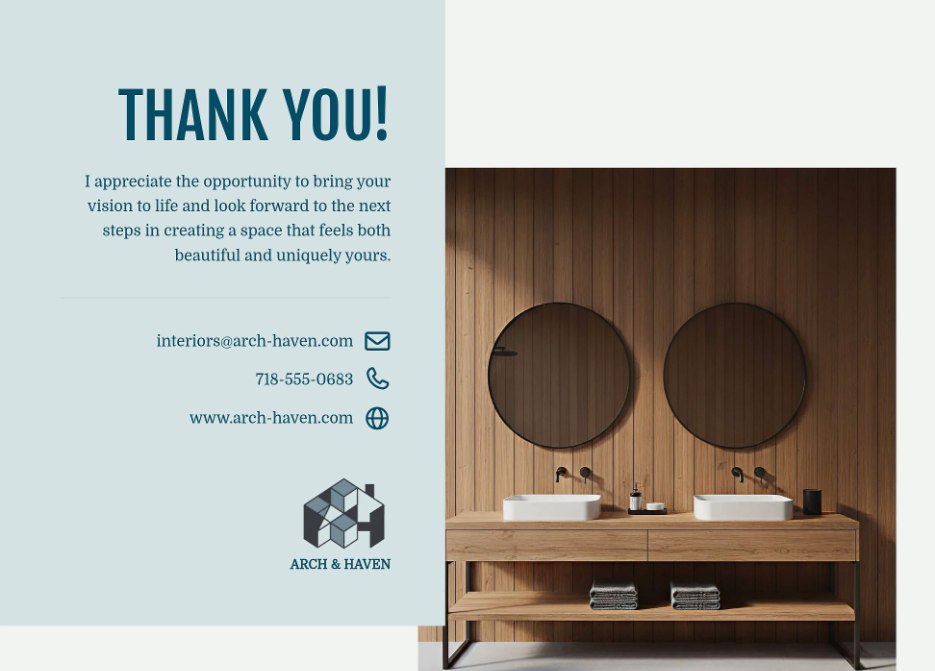
The final thank you slide closes the presentation beautifully. It expresses appreciation, reinforces professionalism, and includes your contact details for easy follow up. It feels gracious, polished, and confident, leaving your client with a lasting impression that feels both personal and refined.
To use this template, create a free account and click Templates.
How to create your interior design presentation faster
Creating a beautiful interior design presentation does not have to take hours of formatting, exporting, and chasing down product links. When your tools work together, your entire workflow becomes faster, smoother, and far more profitable.
Create moodboards that drive decisions
Stop juggling Photoshop, Canva, and five browser tabs. Build polished moodboards right inside your workspace using designer friendly tools that help clients move from inspiration to approval faster. Clean up vendor images instantly with background removal. Adjust scale and perspective for realistic mockups. Add shadows and layering so selections stand out beautifully. Search over 2 million shoppable products, browse full paint lines from Benjamin Moore and Sherwin Williams, or clip items directly from vendor sites into your own digital library. As you design, your product list updates automatically, which means no spreadsheets and no double work.
Build 3D floor plans that eliminate confusion
Help clients clearly see your vision and feel confident signing off. Replace uncertainty with immersive visuals that make decisions feel easy and exciting.
- Start from a template, upload an existing plan, or create from scratch.
- Drag and drop furniture into place and adjust walls, doors, and windows effortlessly.
- Check spacing and flow with accurate measurements.
- Style layouts with thousands of furnishings and apply real paint colors from leading brands in seconds.
- Share bird’s eye views and walkthrough perspectives so clients can fully visualize the space.
When clients can truly see the layout, approvals happen faster and with far fewer revisions.
Design polished client presentations in one workspace
Create high end interior design presentation slides without needing to be a graphic designer. Style text, images, shapes, and backgrounds in seconds. Upload floor plans and elevations, build concept boards, and combine logistics and visuals into one cohesive presentation. Save your layouts as custom templates so you can reuse them for every pitch, welcome packet, or final reveal. Export branded PDF presentations generated in seconds or send a live link so clients can view and comment from any device.
Turn product lists into instant deliverables
Save hours sourcing and transform every selection into something usable across your project.
- Clip images, pricing, dimensions, and specs from any vendor website in seconds.
- Automatically log every item into your project without extra data entry.
- Add products directly to moodboards, quotes, invoices, and purchase orders.
- Organize your growing library by vendor, category, or tag for future use.
- Auto-fill descriptions and pricing to reduce errors and speed up your workflow.
Instead of recreating the same information over and over, you build once and reuse everywhere.
Collect feedback and approvals in one organized place
Stop chasing emails and scattered comments. Invite clients to review designs, leave feedback directly on products, and approve or decline selections with a click. Keep a full history of feedback tied to the right project so nothing slips through the cracks. Control exactly what clients see, from product costs to source links, and release updates when you are ready. With everything centralized in one client hub, approvals happen faster and projects move forward with confidence.
3 essential tips for interior design presentations
Even the most beautiful interior design presentation template will fall flat without the right strategy behind it. These three principles will help you present with clarity, confidence, and control every single time.
1. Build a clear visual story
Your presentation should flow like a narrative, not a random collection of pretty slides. Each section should build on the one before it so your client naturally moves from inspiration to execution.
Anchor your story with strong visuals:
- Use moodboards to establish the feeling, tone, and overall aesthetic direction.
- Present the floor plan to show how the space functions and flows in real life.
- Include renderings so clients can emotionally connect and clearly visualize the outcome.
- Add elevations to demonstrate scale, wall details, and exact placement.
When your visuals are layered in this order, clients feel guided instead of overwhelmed.
2. Control options and decisions
Confidence is one of your most powerful presentation tools. Do not overload your client with endless alternatives. Too many options create hesitation and second guessing.
Show backups strategically rather than upfront. Keep alternative products in your back pocket and introduce them only if needed. This positions you as decisive and prepared.
Design slightly above budget when appropriate, then refine together. Leading with the strongest version of the vision helps clients see what is possible before scaling back thoughtfully. The key is guiding decisions, not crowdsourcing them.
3. Lead the meeting confidently
A great presentation is not just about slides. It is about how you lead the room. Structure creates calm energy and keeps momentum strong.
Keep yourself grounded with simple habits:
- Follow a structured agenda so the meeting stays focused and professional.
- Ask open ended feedback questions such as how do you feel about this direction.
- Clarify next steps clearly so clients know exactly what happens after approval.
When you lead with clarity and warmth, clients feel taken care of. And when clients feel taken care of, they say yes faster.
For more tips, check out our webinar on creating interior design presentations for clients.
Try our interior design presentation templates
DesignFiles offers five interior design presentation templates inside our platform, which offers all of the design and client communication tools you need.
Choose your favorite one and edit it to make it match your brand and signature style.
All of our templates include:
- Cover Slide
- Table of Contents
- Project Overview
- Design Direction
- Color Palette
- Materials & Finishes
- Design Concept
- Floor Plan & Layout
- Lighting Plan
- Elevations
- Estimated Project Timeline
- Next Steps
Here’s a quick look at the cover pages for each template.
Template Style 1
This template offers a clean look with soft header colors and smooth fonts. The overall feel is very simple, especially with the mostly all-white backgrounds.
To use it, create a free account and click Templates.
Template Style 2
Our second template utilizes gray backgrounds to give a more industrial feel. The font style is also sharper and narrower for a modern look.
To use it, create a free account and click Templates.
Template Style 3
This interior design presentation template offers a warmer style. The color palette and materials sections are also laid out a little more creatively, making this a good fit for firms that offer more traditional or cozy designs.
To use it, create a free account and click Templates.
Template Style 4
Our fourth template is our most masculine, high-contrast one. It offers image overlays and a dark background. It’s perfect for firms that design bachelor pads, commercial spaces, and mountain cabins.
To use it, create a free account and click Templates.
Template Style 5
Our last interior design presentation template offers white backgrounds, light gray headers, and a cool-toned color scheme. The fonts are a good mix between modern and friendly. This is a good, all-around template that could work for many different firms.
To use it, create a free account and click Templates.
You can learn more about our presentation templates in this video overview:
Frequently asked questions
A strong interior design presentation should include a project overview, design direction, color palette, materials and finishes, floor plans, lighting plans, elevations, timeline, and budget. Each slide should build on the last, guiding your client from inspiration to practical execution with clarity and confidence.
Most interior design presentations include between 10 and 15 slides, depending on the scope of the project. Smaller rooms may need fewer slides, while full home renovations require more detail. Focus on clarity over quantity. Every slide should serve a purpose.
Yes, including a budget builds trust and transparency. Clients feel more confident when they understand how their investment is allocated across furniture, materials, and labor. Present it clearly and calmly, reinforcing the value behind each decision rather than just listing numbers.
A moodboard communicates the aesthetic vision through curated visuals, colors, and textures. A presentation deck is the full story. It includes logistics like layouts, lighting plans, timelines, and budgets. Think of the moodboard as the feeling, and the deck as the roadmap.
Present interior design projects with structure and warmth. Guide clients through the visual story step by step, explain your reasoning with confidence, and invite thoughtful feedback. End with clear next steps so they feel supported, informed, and excited to move forward.
Build your business on the right foundation with DesignFiles, the top-rated platform on Capterra for small firms and solo designers.