A great design can fall apart without clear communication, especially when it comes to working with contractors. That’s where an interior design spec sheet comes in.
By documenting every detail—from materials and finishes to exact measurements—spec books eliminate guesswork, prevent costly mistakes, and keep projects running on schedule. Instead of endless phone calls and site visits, all essential information is organized and ready to reference.
With the right tools, creating professional spec books is simple, helping designers deliver consistent, stress-free results while keeping clients and contractors fully aligned every step of the way.
Catch the replay here of our workshop with Emily Yeates, or keep reading for the low down:
Table of Contents
What is an interior design spec sheet?
Think of an interior design specification sheet as the ultimate guidebook for bringing your design vision to life. It’s a detailed document that outlines every piece of furniture, finish, fixture, and material selected for a project—like your project’s go-to playbook.
A spec sheet includes all the nitty-gritty details, from product names and dimensions to colors, finishes, and sourcing info. It can even include installation tips, CAD drawings, and placement instructions to make sure nothing gets missed. Basically, it’s how you take all those beautiful ideas from your mood boards and renders and ensure they’re installed just right.
The magic of a spec sheet is that it keeps everyone on the same page—from your clients to contractors and tradespeople. No more endless calls or site visits to answer questions like “Where should this light fixture go?” or “What tile are we using in the kitchen?” It’s all right there in the spec book, giving you peace of mind that your design will be executed exactly as planned.
Using software like DesignFiles makes creating spec sheets super simple. You can easily pull product details from your mood boards, organize them into branded spec sheets, and deliver them digitally or as a beautiful printed book—no headaches, just flawless design execution.
How to create spec books
A well-organized spec book is an essential tool for keeping projects on track and ensuring everyone—from clients to contractors—has the details they need. DesignFiles makes it easy to create branded spec books by starting with a moodboard template. Product images, technical drawings, and detailed specifications can be uploaded to provide a clear visual guide for every step of the project.
SketchUp is a popular tool for creating both 3D renderings and technical drawings. For those new to technical drawings, SketchUp offers an accessible way to create clear visuals that communicate design details. Even without advanced CAD skills, it’s important to focus on clarity. If a specific cabinet detail can’t be drawn from scratch, a photo with detailed annotations works just as well. The goal is to ensure contractors understand the intent without confusion.
A comprehensive spec book should include everything from plumbing and lighting tear sheets to appliance details and finish selections. Even if some details seem unnecessary, providing them upfront helps prevent questions and delays during installation.
Once all the information is collected, it can be organized into a polished spec book using DesignFiles. Digital versions can be shared with contractors, and printed copies can be delivered to clients, ensuring everyone has easy access to essential project details.
What is included in a spec book?
A spec book typically includes:
- Moodboards: At least one for each room, created in DesignFiles.
- Technical Drawings: 2D elevations, CAD drawings, and 3D renderings.
- Finish Schedule: An organized spreadsheet with links to all materials the contractor needs to purchase. Items ordered by the designer are labeled accordingly.
- Tear Sheets: Detailed product sheets for lighting, plumbing, appliances, and more.
- Samples: Physical samples like paint swatches and cabinet finishes can be included in a branded binder.
The goal is to provide all the details a contractor needs to complete the project without confusion.
Spec book examples
Emily Yeates, the owner of Urban Revival, a design studio based in Phoenix, recently hosted a live workshop with DesignFiles. She showed us her spec book strategy and offered plenty of examples.
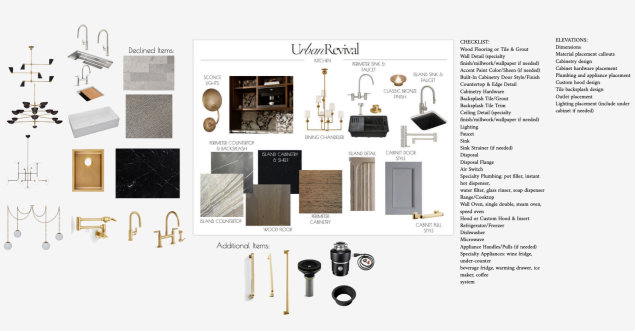
1. Kitchen checklist
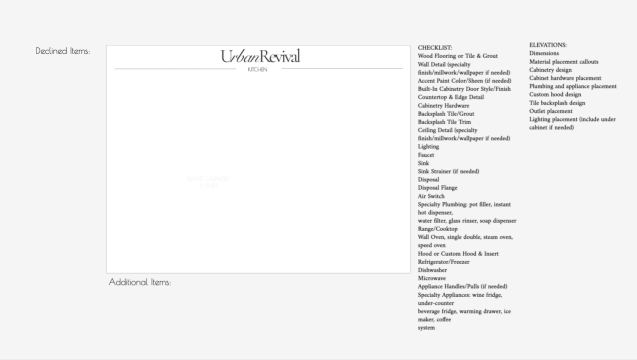
The template then gets completed with items from the design mood board:
2. Light fixture hanging
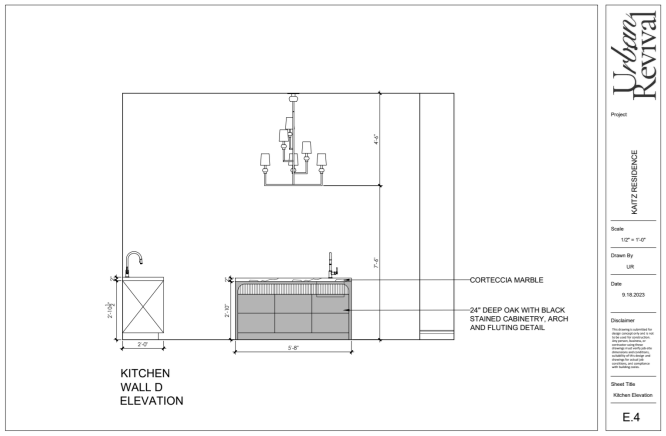
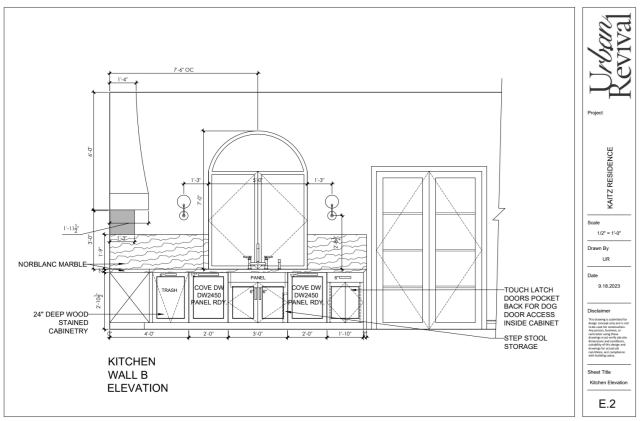
3. Kitchen wall elevation
Essential tips for creating spec books
Follow these tips to create high-quality spec sheets that get the job done.
1. Start with a detailed checklist
Begin by creating room-specific checklists to ensure no details are overlooked. For example, a kitchen checklist might include appliances like warming drawers, microwave drawers, and hood inserts. Drag these lists into your spec book to keep them organized and easily accessible.
2. Include CAD drawings and renderings
Incorporate CAD elevation drawings and 3D renderings into your spec book. These visuals help contractors understand the design intent, including dimensions and placement details for things like sconces, light fixtures, and cabinetry. Even inexperienced contractors can follow a well-detailed spec book without confusion.
3. Make clients approve or decline items before moving forward
One key process is to have clients accept or decline each item in the spec book before moving to the next phase of the project. This ensures everyone is on the same page and minimizes last-minute changes.
4. Provide hyper-detailed installation instructions
Don’t assume contractors know every detail. For example, include specifics like how deep a hood insert should be or exactly where hardware should be placed. Clear instructions help avoid questions like, “How high should this light fixture hang?”
5. Organize spec books digitally
Upload spec books to a digital platform, like Google Drive or DesignFiles, so contractors can access them online. Digital access allows them to zoom in on drawings, print pages if needed, and reference details on the go.
6. Over-deliver on details to avoid site visits
Aim to eliminate unnecessary site visits by including everything a contractor might need in the spec book. This should cover finish selections, product links, dimensions, tear sheets, and any visual aids that reduce questions during the installation process.
7. Keep sample kits for clients
For clients, create a beautiful, branded physical spec book with printed moodboards, CAD drawings, and finish schedules. Include Velcro pouches for material samples, like paint swatches or cabinet finishes. Make it clear that this book stays on-site for easy reference.
8. Update spec books as needed
If changes occur, such as a product going out of stock, update the CAD drawings or spec sheets, and re-upload the revised files with a new date. Archive old versions to avoid confusion.
9. Hire technical help if needed
If technical drawings aren’t your strength, invest in hiring a CAD specialist. Paying a little more for a detailed designer is worth avoiding the cost and frustration of site visits to fix errors.
10. Document every contractor question for future updates
Track every question you receive from contractors and add it to your processes. Over time, this creates a master checklist that covers any potential gaps, preventing repeat questions on future projects.
FAQs about interior design spec books
Keep reading for detailed answers to important questions.
Once the spec book is complete, it’s time to present it during a pre-construction (pre-con) meeting. This meeting includes the client, the contractor, and occasionally any subcontractors the contractor wants to bring along. The goal is to go through the spec book page by page, addressing any questions on the spot to avoid confusion later.
A physical, beautifully branded spec book is provided to the client, and it stays on-site throughout the project. The contractor receives a digital version to reference on their devices. This system ensures that both the client and contractor are aligned, reducing the risk of errors. Plus, clients love showing off their stylish spec books, making them a valuable marketing tool for your business.
During the walkthrough, every detail is covered—from moodboards and finish schedules to CAD drawings and samples—giving everyone confidence in the design plan. After implementing this process, many designers find they no longer receive calls for clarifications or site visits, meaning the project runs more smoothly from start to finish.
The best way to avoid taking responsibility for contractor mistakes is to set clear boundaries and provide all necessary information upfront in the spec book. The spec book should be comprehensive, including every product detail, finish selection, and installation note to ensure there’s no room for confusion. Once the contractor has the digital spec book, it becomes their responsibility to follow it exactly.
It’s also important to communicate to clients that you do not manage the contractor. If a mistake happens—like ordering the wrong cabinets or using the wrong tile—refer the client back to the spec book. If the contractor deviates from it, that’s on them, not you. Keeping this boundary helps maintain your role as the designer, not the project manager.
When issues arise, offering empathy and support goes a long way. Providing solutions, like recommending a new contractor or helping navigate fixes, shows professionalism without taking ownership of the error. Ultimately, the spec book empowers both the client and the contractor to stay on track, and when followed correctly, it greatly reduces the need for your involvement in on-site issues.
When a change is needed in the spec book, such as a product being out of stock or a design adjustment, the updated CAD drawing should be re-uploaded to Google Drive. Each updated file is clearly labeled with the new date to avoid any confusion. The old version is archived to ensure there’s always a record of previous designs.
After the updated file is uploaded, send a note to the contractor, letting them know that the drawings have been revised and are ready to use. This process keeps everyone working from the most current information and ensures that contractors have access to live updates without needing to chase down new files.
By using cloud storage like Google Drive, contractors can zoom in on drawings, download large print files if needed, and always reference the latest version—keeping the project on track with minimal back-and-forth.
You can download Emily’s spec book checklist here.
The specifications schedule is downloaded from DesignFiles as a CSV file, which is then cleaned up and customized. The schedule often includes furniture details, and formatting ensures it looks polished and professional. While DesignFiles handles most of the heavy lifting, the downloaded file is refined to meet the project’s needs before being shared with clients or contractors.
Managing contractors can feel like a way to stay involved in the project, but it’s not where the real profit is. Taking on that responsibility opens you up to legal risks, and the time spent managing contractors isn’t worth it financially. Instead, focus on creating a thorough spec book and being available to contractors if they have questions. That keeps projects moving without tying up your time.
Shifting the focus to furniture sales is where the real revenue growth happens. By adjusting how you present furniture to clients early on, it’s possible to secure more furnishing projects. For many, this approach can turn 80% of revenue into furniture sales, while only 20% comes from service fees. Managing contractors full-time limits the ability to sell more furniture, which is where designers can make significantly more money.
It depends on the item and the project flow. For slower seasons, it might make sense to purchase items like tile or plumbing. However, managing those purchases can be time-consuming, especially if something goes wrong, like a wrong measurement or a return.
In most cases, it’s better to let the contractor handle those purchases. They’re responsible for ordering and managing any returns or adjustments. However, items like light fixtures, mirrors, and hardware are worth purchasing directly if they have good profit margins. Focus on sourcing products that add to your revenue, and skip handling items that don’t.
A great way to find a technical designer is by asking within your network. Local design groups, like IDS (Interior Design Society), are a good resource for recommendations. Online platforms like Upwork can also be helpful, but finding someone through word-of-mouth tends to yield better results.
Look for someone who enjoys the detailed work of CAD drawings and prefers to stay behind the scenes. The ideal candidate isn’t looking to start their own design business but is happy focusing on technical drawings. Many designers have success with long-term contract employees who specialize in delivering precise, high-quality work.
It rarely happens. In most cases, contractors and clients stick to what’s specified because of how thoroughly the design is presented. Full presentations—with samples for every finish, tile, and fabric—help everyone visualize the final look. Changing one item would affect the entire design, making substitutions less appealing.
If a client or contractor does question a selection, they know to reach out first. Open communication ensures that any budget concerns are addressed by swapping items before a purchase is made. This process keeps vendor relationships strong and maintains design integrity without issues.
For furnishings-only jobs, a full spec book isn’t typically provided. Instead, clients receive detailed quotes with product descriptions that are intentionally generic to make it harder for them to search for the exact item online.
Pricing is kept competitive to discourage clients from shopping around. If an item is easy to find online, it might be priced slightly lower to prevent price-matching issues. In cases where a client does find a lower price, offering to match it helps maintain trust and secure the sale without losing business.
The best approach is to hire someone in-house once furnishing projects reach a level where managing orders, payments, and deliveries becomes too time-consuming. Instead of relying on purchasing groups—which can reduce your profits—training your own procurement person allows you to keep control over pricing and processes.
Use a step-by-step training manual that outlines how to handle quoting, order tracking, claims, and returns. It’s more efficient to have one person manage the entire process rather than splitting tasks to hide markups. When pricing is structured correctly, markups become a non-issue, and transparency builds trust with your team and clients.
Streamline your business with DesignFiles, the top-rated platform for small and solo design firms.

![How to Create an Interior Design Presentation [Free Templates]](https://blog.designfiles.co/wp-content/uploads/2023/04/AdobeStock_220663994-768x512.jpeg)